0. Gearing Up
Campers, wecome to CAMP110! By this point, you should be fully geared with your laptop’s operating system up-to-date, software installed, and workspace ready to go. If you have not completed those steps yet, please do so before journeying off into this exercise.
1. Starting from the Trailhead
Before opening up VSCode, you will want to be sure Docker Desktop is running on your computer. On a Mac, you can check this by looking for the whale with boxes icon in your top menu bar. On Windows, you can check this by looking for the whale with boxes icon in your system tray. If you do not see the icon, open the Docker Desktop application from your start menu or applications folder.
Our programming journey begins in Visual Studio Code, a free, leading text-editor designed for software development. Go ahead and open Visual Studio Code!
Once open, from the “File” menu, select “Open Recent…”. After completing the setup instructions above, you should see two entries with comp110-24s-workspace-[Your GitHub Username]. You want to select the one with [Dev Container] at the end of it. Go ahead and open it up!
You should be greeted with window that looks like the following (if tabs are open in the main part of the window, you can close them):
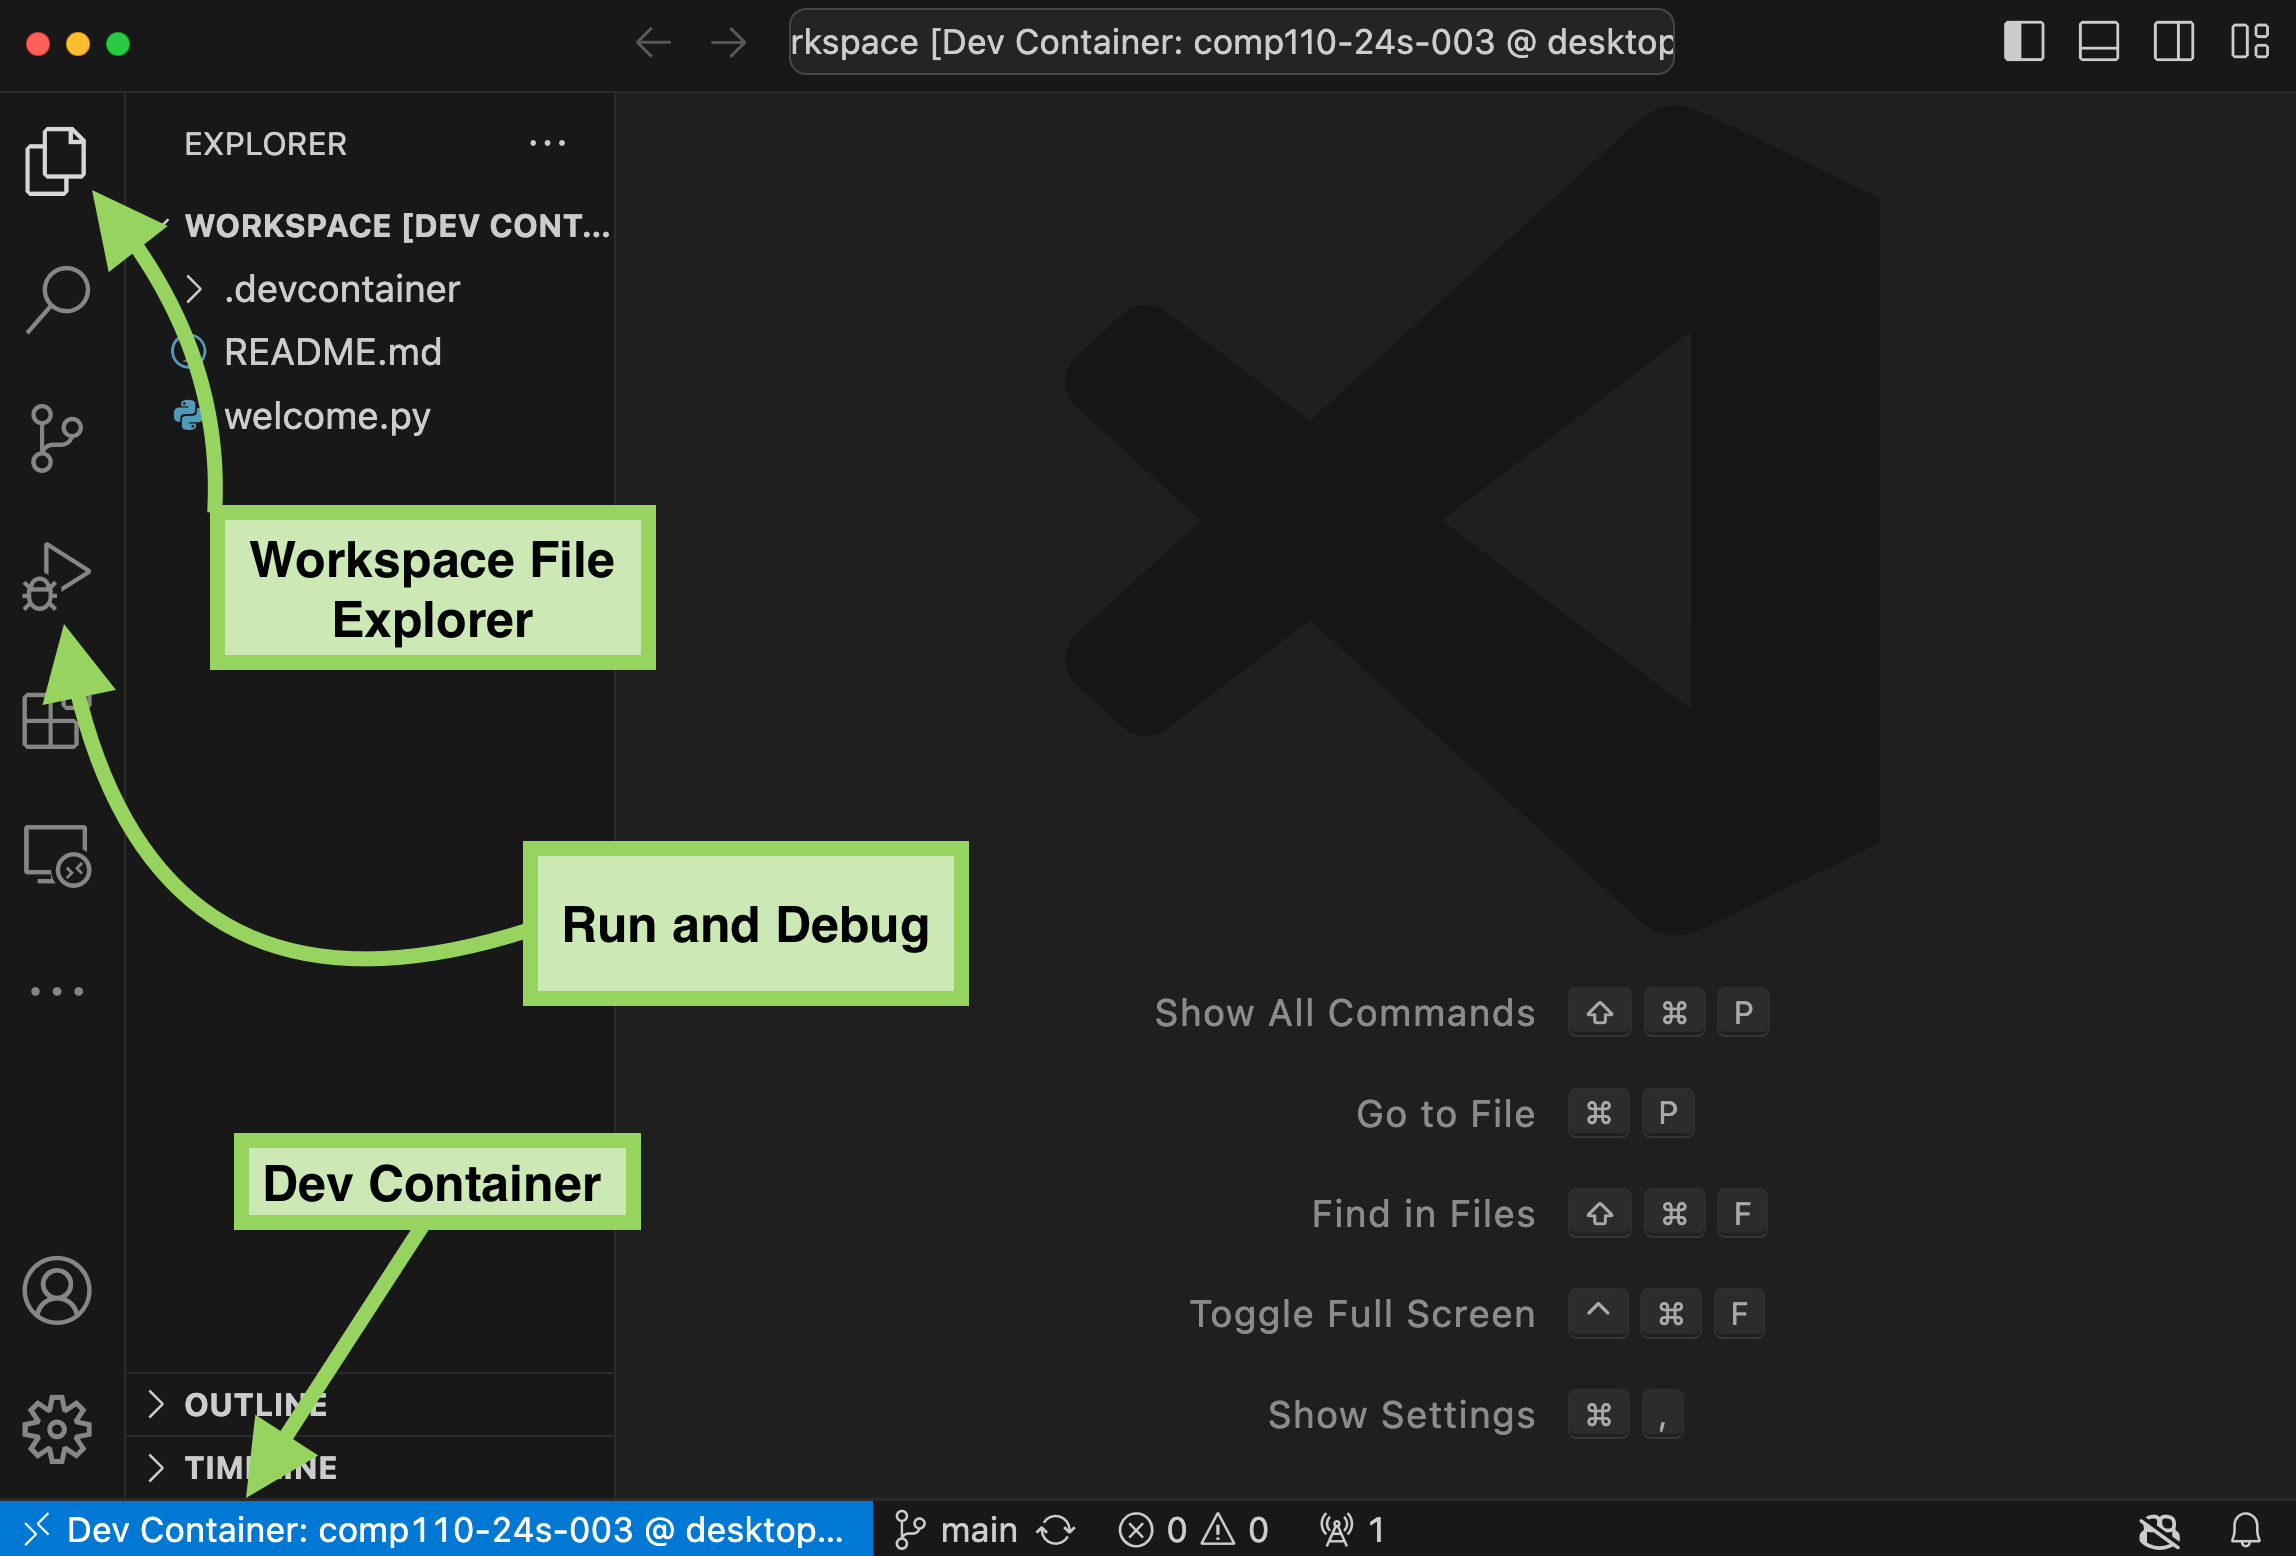
There are three important parts to recognize in this window you will make use of through the semester:
In the bottom left corner, you should see “Dev Container: comp110-24s-003” as shown in the photo above. If you only see the
><icon, open the VSCode command palette by pressingCtrl+Shift+P(orCmd+Shift+Pon Mac) and type “Reopen in Container”. This will open the Dev Container and you should see the “Dev Container: comp110-24s-003” appear.In the top left corner, you will see an icon with two files that represents the “File Explorer”. Clicking it will open, or toggle closed if it is already open, a panel that shows the files and directories in your workspace.
Finally, there is a sidebar button with a Play icon and a bug for the “Run and Debug” panel. This panel is where you will start the Trailhead app from. You will learn about additional “debugging” capabilities found in this panel soon.
2. Starting Trailhead
Open the “Run and Debug” pane, as discussed above, and press the green play button. You should see a new terminal window open in the bottom of the screen and a message that says “Starting Trailhead server at http://localhost:1110” appear in a terminal. You can close this terminal pane with the X after seeing this message.
As shown in the video above, your next step is to open a web browser (Google Chrome is recommended for our course) and navigate to http://localhost:1110. You should see Trailhead’s home page! If you do not, try the address http://127.0.0.1:1110 instead. These two web addresses, localhost and 127.0.0.1 refer to your personal computer and the :1110 refers to the “port number” Trailhead is running on. One-thousand 110, hopefully a memorable number :)
From the “Trailhead” home screen, your workspace’s modules are listed. The “welcome” module refers to the welcome.py found in the “File Explorer” pane of VSCode. Opening the “.py” file, you can see the code which resulted in the message being displayed in Trailhead.
We recommend keeping VSCode and your browser, with Trailhead open, side-by-side such that you can see both at the same time. As you are writing programs, you will want to see and interact with the results of your work in the Trailhead browser window.
3. Writing Your First Program
In Trailhead, navigate back to the home page by clicking “Trailhead” in the navigation.
In VSCode, open the “File Explorer” pane and right-click in the blank space. Select “New File” and name the file ex00_hello_world.py. Double check that the filename exactly matches what is specified here. In Trailhead, you will see the your new module appear. If you click to open it, you will see that the “module exited without output.” This is because the file is empty.
Open the ex00_hello_world.py file in VSCode and type the following:
print("Hello, world!")Save the file again, by pressing Ctrl+S (or Cmd+S on Mac). In Trailhead, you should see the message “Hello, world!” now appear as output. This should happen automatically upon saving, but you can also manually run the program again with the green “Run Again” or “Rerun” button.
Congratulations! You have written your first program in Python! For over fifty years, it’s been a rite of passage for new programmers’ first program to print “Hello, world!” to the screen. Wooo! You’ve taken your first step on the trail to becoming a programmer!
4. Writing Your First Function
Functions are the most fundamental building block of programming. They exemplify the fundamental pattern of taking one or more input values, processing them in an “algorithm”, and returning a result. You will be learning a lot about functions this week and building upon this knowledge throughout the course. For now, let’s write a function that takes a name as an input parameter and returns a string that greets the person by name.
In VSCode, go ahead and delete the previous print statement that printed “Hello, world!” to output. Add the following function definition to your ex00_hello_world.py file. Note that the second and third lines are indented, this formatting is important.
def greet(name: str) -> str:
    """A welcoming first function definition."""
    return "Hello, " + name + "!"
When you save the file, in Trailhead you will see that the module once again exits without output. That is OK! We have defined a function, but we have not yet called it. Let’s do that now.
In Trailhead, switch to the “Interact” tab. This tab allows you to interact with your Python module using what is known as a “REPL”, short for a “Read, Evaluate, Print” loop. From the “Interact” tab, you will see the greet function you defined listed in “Globals”.
Let’s try making use of this function! In the text box, try typing the following function call expression and pressing enter:
greet(name="Campers")Try typing another function call expression, but this time put your name in the quotes. For example, if your name is “Kris”, you would type:
greet(name="Kris")Feel free to try calling the function with other names, as well!
Your interactions should look something like this:
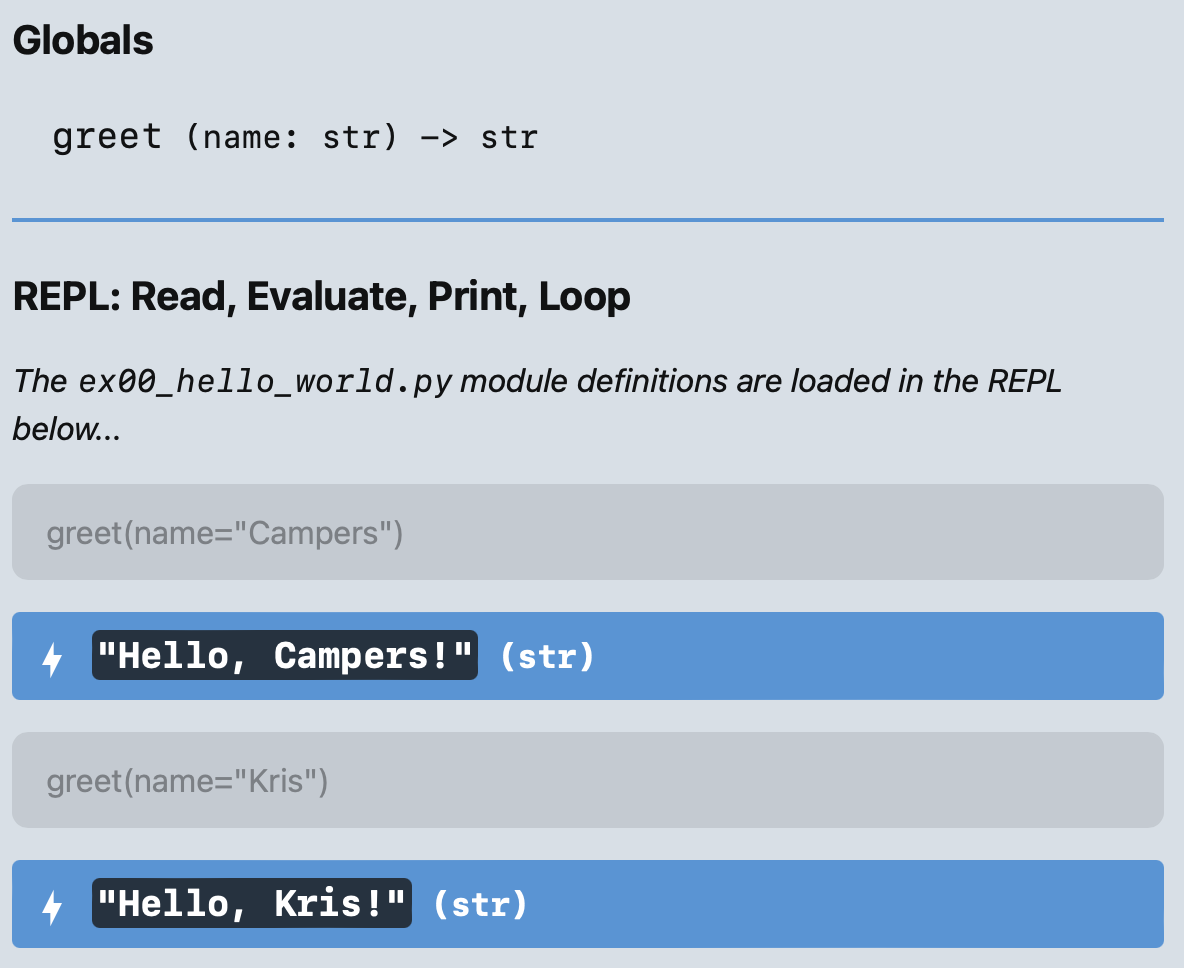
greet REPL Interactions
Let’s break down what is happening here by starting with the function definition in VSCode. The following image points out the important parts of this function definition:
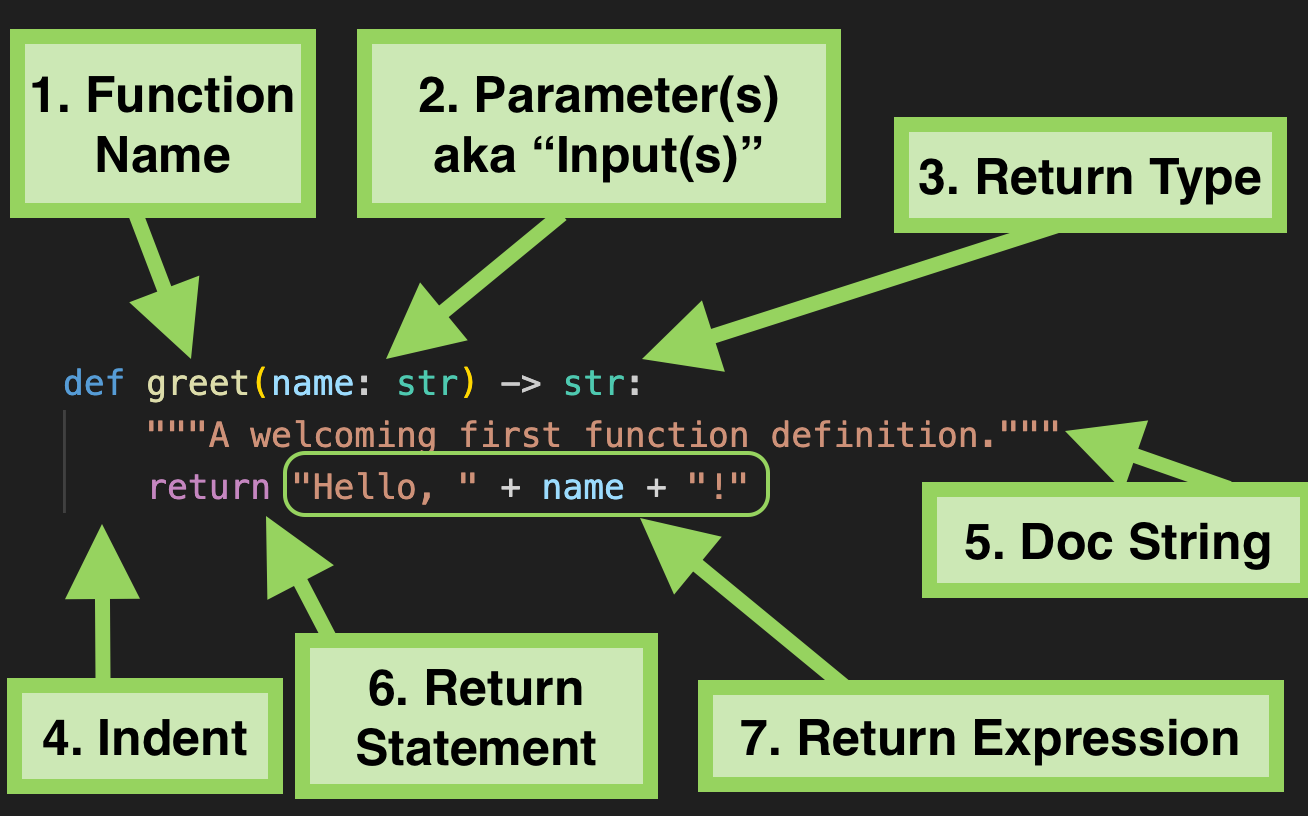
greet Function DefinitionA function definition is like a cooking recipe: it has a name, some required ingredients, and an expected result. Inside the definition are one or more steps the recipe follows to produce a result. For now, our functions will be simple, single-step recipes, but as you learn more about programming, you will learn how to write more complex functions. Importantly, a function definition does not actually do or produce anything until it is “called” or “invoked”, like a printed recipe does not produce any food until it is “followed” or “cooked”.
Function definitions begin with the keyword
def, short for “define”. The function name isgreet, which is an identifier. In Python, an identifier is any sequence of letters, numbers, and underscores that starts with a letter or underscore. An identifier is just a name we as programmers choose to refer to things in our programs. In this case it’s the name for the function we are defining.In a function definition, following the function’s name identifier, there will always be a pair of matching parentheses
(). Inside the parentheses, we can list the parameters of the function. Parameters are the “inputs” given to a function when it is called. In this case, we have one parameter,name, which is specified to be a string parameter expecting textual input. In class, we’ll learn how to define functions with multiple parameters.Following the parentheses, there is a dash
-followed by a greater than sign>which you think of together as an arrow->. What follows the arrow is the return type of the function. This is to say, when a function call expression to this function is evaluated, it will result in astrvalue. In other words, parts 1 through 3 together, say “I am defining a function namedgreetthat takes astrparameter namednameand returns astrvalue.” The return type is followed by a colon:which signals the “header” of the function definition is complete and what follows is the function definition’s body.Indentation is important in Python. Although invisible, the indentation signals that the following lines belong to the function definition. As soon as you stop indenting, you are no longer defining the body of the function.
The Doc(umentation) String is a special kind of comment that describes the purpose, and often usage, of a function for you and other programmers. It does not affect the behavior of the function in any way, thus it is your responsibility to write them truthfully and accurately for the functions you define to avoid confusing yourself or others.
The
returnkeyword denotes a “return statement” that signals at this point in the function a result will be “returned” to the function call expression and the evaluation of the function body is complete.The
returnkeyword is followed by an expression. This expression must evaluate to the same type as #3 the function’s specified return type. In this case, the expression is"Hello, " + name + "!". This expression is a string concatenation expression that results in forming a largerstrvalue out of the string literal"Hello, "being concatenated with the input parameter valuenameand the string literal"!".
Now that you have a sense of the key parts of this function definition, let’s break down the function call expressions you typed into the REPL and understand how they relate to the function definition.
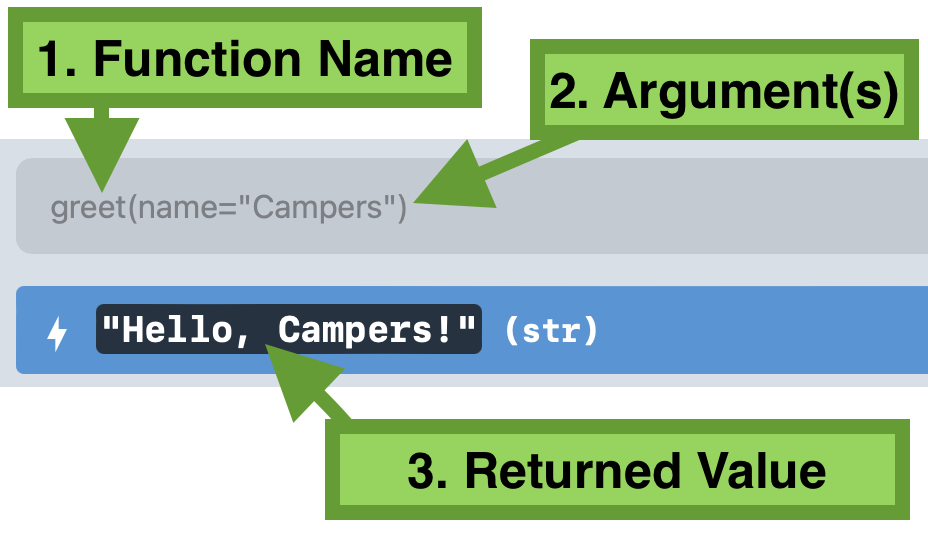
greet Function Call ExpressionIf defining a function is like writing down a recipe for biscuits, calling a function is like baking the biscuits. Mmm… let’s bake some biscuits!
As a reminder from the reading on expressions, a function call is an expression like any other expresion: it evaluates to a value of a specific type. In the REPL, you wrote a function call expression, then pressed enter, which caused the expression to evaluate, and finally you were presented with the value and type the function call expression evaluated to.
A function call expression begins with an identifier which is the name of the function you are calling. Extremely importantly in a function call, the name of the function is followed by a pair of matching parentheses
(). This is how Python knows you are calling a function and not just referring to the function by its name. (To illustrate this, try just typinggreetinto the REPL and pressing enter. You will see the parameters and return type display because that is the function definition the namegreetrefers to.)Argument(s) are specified inside of the parentheses. Here we are using a special kind of argument, called a keyword argument, that specifies the name of the parameter we are providing an input value for, followed by the
=symbol, followed by the value the parameter will be assigned. Argument values are expressions.
When you press enter, this function call expression is evaluated. Python will begin by looking at the identifier you gave, greet, and see if it knows what this name refers to. Well, in your module, you defined a function named greet. Python then sees, thanks to the parentheses following the identifier, that this is a function call so it checks to see “does greet refer to a function definition?” It does! So, Python will then take the argument value provided (in this case, name="Campers" says "name is assigned to be the str "Campers") and bind the str value "Campers" to the corresponding parameter in the function definition. Python then jumps into the function definition’s body and begins evaluating its code line-by-line. In this case, the only line of code is the return statement with the expression "Hello, " + name + "!". This statement evaluates the identifier name to be bound to the value "Campers", thus returning the concatenated value "Hello, Campers!".
- The Return Value from the evaluated function call is then displayed in the REPL as soon as the function call completes. In Trailhead, when you evaluate an expression in the REPL, the result is displayed in a blue box with a lightning bolt icon. This is to indicate that the code you entered into the REPL was an expression and the visualization indicates both the returned value, as well as its type.

Fern Question 1. If an argument can be an expression, as claimed above, can you think of an example expression to use as the name argument in a call to your greet that is not just a str literal? This is a way of proving to yourself that an argument can be an expression. Try this in the REPL!
Fern Question 2. If a function call to greet is an expression, can you use the resulting value of a call to greet as the name argument to another call to greet? Try this in the REPL!
5. Ceremonial Program Structure
Changing tabs back to the “Run” tab in Trailhead, you will see that the module still exits without any output. This is because in your module, you have not made use of the function definition; you were experimenting with it in the REPL. This is not only OK, it’s a common strategy for writing programs: start with small functions, test them out to be sure they work, and build larger programs with them.
The code you are about to add to the bottom of your ex00_hello_world module is “ceremonial” in nature, because it appeases a convention of the Python programming language. It’s specific to the Python programming language, and idiomatic, but different languages have different idioms for achieving the same effect. What, exactly, it means is beyond your concern right now. This is one of the few places we will tell you to just “do it this way and don’t worry about it yet.” In the weeks ahead, we will reveal the mysteries behind the ceremony.
Add the following two lines of code to the bottom of your ex00_hello_world.py file. Be sure the if keyword is at the same level of indentation (no indentation!) as the def keyword of the function definition above it.
Note that there are two underscores on each side of the identifier __name__ and inside the string literal "__main__".
if __name__ == "__main__":
    print(greet(name=input("What is your name? ")))
Before revealing what this code is doing, please try saving your code and running it again in Trailhead. Now, come back to the code, and try and break down the second line for yourself. Just like in math, you can expect to work your way from the innermost parentheses outward.
What do you suspect that input("What is your name? ") is doing? It is a special function call expression that returns a str.
Since the input function call is an expression that returns a str, try to explain what you suspect the next expression evaluates to: greet(name=input("What is your name? ")).
Finally, what must print be doing?
I’ll bet your intuitions on how this works are very close, if not fully correct!
Let’s reveal at what is going on in this little snippet! First, the line if __name__ == "__main__": is a special kind of statement called a conditional statement you’ll learn about in a few weeks. The effect it has here is when you run this program in the “Run” tab, the indented code beneath the if statement will be evaluated. However, when you load this program in the REPL of the “Interact” tab, the code beneath the if statement will not be run. This gives us the best of both worlds.
Next, under the if statement, you added some nested function calls. The innermost function call is input("What is your name? "). The input function is a Python built-in that prompts the user of a program for a textual input, waits for the user to enter some text and once the user does, the function call expression to input evaluates to the str of text the user typed in. For the sake of simplifying the explanation, let’s assume that you typed in the "Campers" when prompted for a name.
The next function call evaluated is greet(name="Campers"), where the name argument will be "Campers" because that’s what the call to input evaluated to in the previous paragraph. This function call expression works through the same set of steps described in the previous section and calls your greet function! Remember, your greet function returns a value of type str, so this function call expression also evaluates to a str whose value is "Hello, Campers!".
Finally, the last function call expression to evaluate is print("Hello, Campers!"). This buit-in function “prints”, or displays, the argument it is given to your program’s output and causes the text, without any quotes or its type, to appear as the next line of textual output in your program. As an astute reader, I am sure you are wondering, “if the print function call is an expression and every expression evaluates to a value, what type of value does print evaluate to?” I’m so glad you were wondering! The function print is a special kind of function that evaluates to a “nothing value” in Python called None; functions that return None tend to have “side-effects” on the “environment”. In this case, print’s side-effect is causing output to display on your screen.
We can try to bring these successive evaluations together into a single sequence of steps. These substitutions are effectively what is happening behind the scenes as your program is evaluated, starting with step 1 where the user is prompted “What is your name?” and responds with “Campers”. Notice how each inner expression is simplified down to a single value, and then the next outer expression is evaluated with the simplified value.
1. print(greet(name=input("What is your name? ")))
2. print(greet(name="Campers"))
3. print("Hello, Campers!")
4. None, but output to the screen: Hello, Campers!
Why did you need to call print here, but not when using the REPL? If you recall, the REPL is short for “Read-Evaluate-Print-Loop”. The “Print” step is built-in, and automatically “Prints” the evaluation of your expressions, so that you do not need to print the result of an expression yourself. In Trailhead, we highlight this difference and denote the automatically printed expression output in blue. If you switch back to the REPL and try evaluting, print("Hello") and then "Hello" as two separate expressions, you will see the difference. We will talk more about this in class because the distinction is both important and often a conceptual hurdle for new programmers.
6. Module Documentation and Attribution
One other convention in Python, and COMP110, is to add some documentation to the top of your module. Add the following lines of code above the greet function definition in your ex00_hello_world.py file:
"""My first exercise in CAMP110!"""

__author__ = "123456789"
Be sure to replace 123456789 with your 9-digit UNC PID! Also, be sure that you have two underscores surrounding both sides of __author__, not just one.
Save your module and navigate back to the Trailhead home listing. Notice that your module’s Doc String is elevated to the module’s description to serve as a brief overview of what each module does. Just like doc strings in function definitions, module doc strings in modules are for you and other programmers to read to understand the purpose of a module in English. The __author__ line establishes a special variable, which we will learn more about soon, that attributes your work to you.
6. Submitting Your Work
Now, let’s get your work submitted to the autograder! In VSCode, open a new integrated Terminal with `Ctrl+Shift+``, or going to the Terminal menu and selecting “New Terminal”. We will learn more about what the terminal is and gain experience with “command line interfaces” later in the course. For now, enter the following command into the terminal and press enter:
python -m tools.submission ex00_hello_world.pyYou will notice a file appeared in your workspace named 24.01.dd-hh.mm.ss-ex00_hello_world.py.zip. You will see numbers for the current day of the month in place of dd, 24-hour digits in place of hh, minutes in place of mm, and so on. This “zip” file contains your ex00_hello_world.py file and is what you will submit to the autograder.
In Gradescope, open assignment “EX00 - Hello World”. You should see an area to upload a zip file. Click this area and browse to your course’s workspace directory on your computer. You should see the zip file you just created. Select it and upload it to Gradescope. Autograding should complete within about a minute and you should see a score of 100%, or more if you are submitting early. If you see less than 100%, try to understand the feedback and resubmit. If you are still having trouble, please come see us in office hours!
7. Make a Backup Checkpoint “Commit”
Now that your first program is complete, let’s practice making a backup. Visual Studio Code has built-in support for git source control management (SCM). SCM tools are made to help create versioned checkpoints of a project’s source code (your program is source code!) amont other uses. The current de facto SCM is called git. As one more piece of terminology, a checkpointed version in git is called a commit. Once your work is in a commit checkpoint, you can always return back to your project at that point in time without the risk of losing work. We encourage committing work to backup at least each time you submit a project for grading or are finishing out a working session for the day. Commits are free to make and can only help you avoid losing work; use them liberally!
- Open the Source Control panel (Command Palette: “Show SCM” or click the icon with three circles and lines on the activity panel).
- Notice the files listed under Changes. These are files you’ve made modifications to since your last backup.
- Move your mouse’s cursor over the word Changes and notice the + symbol that appears. Click that plus symbol to add all changes to the next backup. You will now see the files listed under “Staged Changes”.
- If you do not want to backup all changed files, you can select them individually. For this course you’re encouraged to back everything up.
- In the Message box, give a brief description of what you’ve changed and are backing up. This will help you find a specific backup (called a “commit”) if needed. In this case a message such as, “Finished Exercise 00!” will suffice.
- Press the Commit button to make a Commit (a version) of your work.
- In the Terminal, type the command
git push --set-upstream backup main. If your terminal was closed, go to the Terminal menu and select “New Terminal”. This command “pushed” your changes to your backup repository on GitHub.
To see your commit on Github, in a web browser, navigate to https://github.com/comp110-24s-003/comp110-24s-workspace-USERNAME and substitute USERNAME with your GitHub username. You should see your work in ex0_hello_world.py backed up to GitHub. Notice above the file’s content’s you’ll see your commit message.
8. Congratulations!

HOO! You have completed your first exercise in the course! Most exercises will require you to write functions on your own, but as we are getting started we wanted to guide you through each of these steps with narrative so that you could learn some important fundaments.
In this exercise, you experienced many big ideas you will encounter frequently in the trails ahead:
- Defining a Function with a single parameter, return type, doc string, and return statement
- Calling a Function Definition with a Keyword Argument
- Using the REPL to Interact with Functions and Expressions
- Making a module runnable as a program (the
if __name__ == "__main__":part) - Prompting the user for
inputandprinting output - Documenting a module with a doc string and author attribution
- Submitting a COMP110 program to Gradescope for autograding
- Backing up your work to GitHub