
Overview
In this exercise, you will write a program to help you plan a cozy tea party. The program will ultimately ask the user for the number of guests and you will calculate the quantity of tea bags needed, the number of treats to accompany the tea, and the expected cost of the party.
Here’s an example of using the program if you imagine we are trying to throw a tea party for all 301 students in COMP110 and our 33 team members:
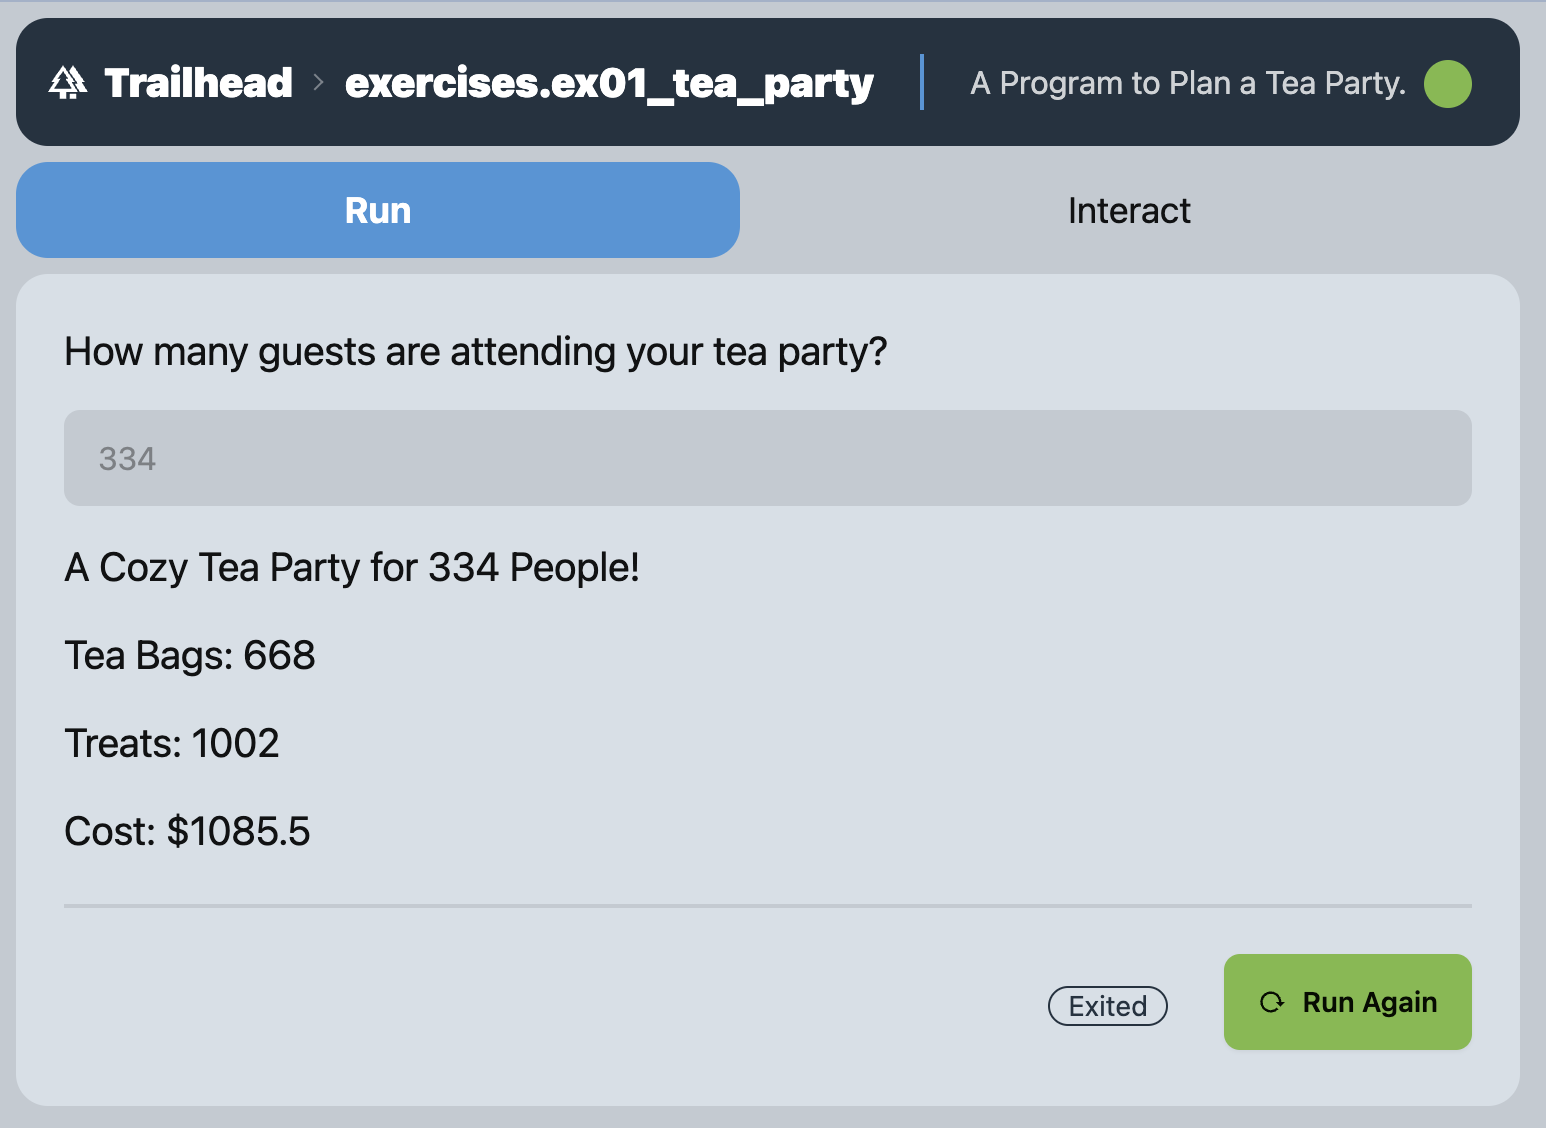
Now we just need a donation for $1,085.50 to bring this dream to life!
Since this is our first program in COMP110, we will specify the structural expectations and function designs for you to implement and it is important to follow these expectations closely. This program is autograded and the only path toward achieving full credit is to achieve full credit via the autograder.
The purpose of this exercise is to gain practice with the following concepts:
- Decomposing a larger program into small subprograms
- Writing multiple small functions that each solve a single problem
- Writing functions that call other functions
- Writing a “
main” function that orchestrates the program’s execution
Students with prior programming experience: please note that in this exercise you should limit yourself to making use of only the concepts we have covered in lecture. The autograder has some checks in place to penalize the usage of concepts we have not yet covered. Limiting yourself to only what we have covered is good practice. Anything we have discussed in lecture is permitted.
0. Getting Started
Start your COMP110 DevContainer by first being sure Docker Desktop is running, then opening VS Code, then using the File > Open Recent menu to select the “COMP110 Workspace” folder that has [Dev Container] following its the name. This will open a new VS Code window with the DevContainer running. Finally, go to the “Run and Debug” view to press the play button to begin Trailhead. Open Trailhead in a web browser tab and arrange your windows side-by-side. These are the steps we will generally get in the habbit of following as work begins on a project.
Now, add a directory named exercises to your Workspace: go back to the “File Explorer” tab in VSCode. When you move your mouse over the word “Workspace” you will see the New Folder button (a folder with a plus symbol) appear. Click this button, then name the directory exercises.
Next, right click on the exercises directory and select “New File”. Name the file ex01_tea_party.py. This is where you will write your program.
Another good habit to get into is to add a Docstring and __author__ attribution line to the tops of your exercise files. Go ahead and add a Docstring for this program to your ex01_tea_party.py file found in the exercises directory. Your Docstring should state the goal of this program, based on the overview above, in one sentence in your own words. Once you save this, you should be able to navigate to the exercises directory in Trailhead, see ex01_tea_party listed, and see the Docstring you added.
Add two blank lines below the Docstring, then add the __author__: str = "123456789" line, substituting your UNC PID for the 123456789 value.
Looking at the program output above, there are multiple computations that will need to be performed to produce the output. We can decompose the problem into simpler subproblems, such as:
- A function to compute the number of tea bags needed based on number of guests
- A function to compute the number of treats needed based on the number of teas guests are expecting to drink
- A function to compute the cost of the tea bags and the treats combined
- Bringing these function together in a “main planner” function that calls each and produces printed output
- Making the program runnable and asking a user for input when they run the program
Let’s start with the first subproblem.
1. Defining the tea_bags Function
Start simple with adding a couple blank lines following your __author__ line and then define a function with the following expectations:
- Name:
tea_bags - Parameters:
peopleparameter of type:int- the number of guests attending the tea party
- Return Type:
int - Add a Docstring describing the purpose of the function
Assume everyone at the tea party will drink two cups of tea and, therefore, we should plan to have two tea bags for them. Implement the body of this function to satisfy this expectation and return the number of tea bags needed based on the number of people the function is called with.
Once you have implemented your function definition, save your file, and test it out in the Trailhead Interact REPL. You should expect to be able to make calls and see their return values like below:
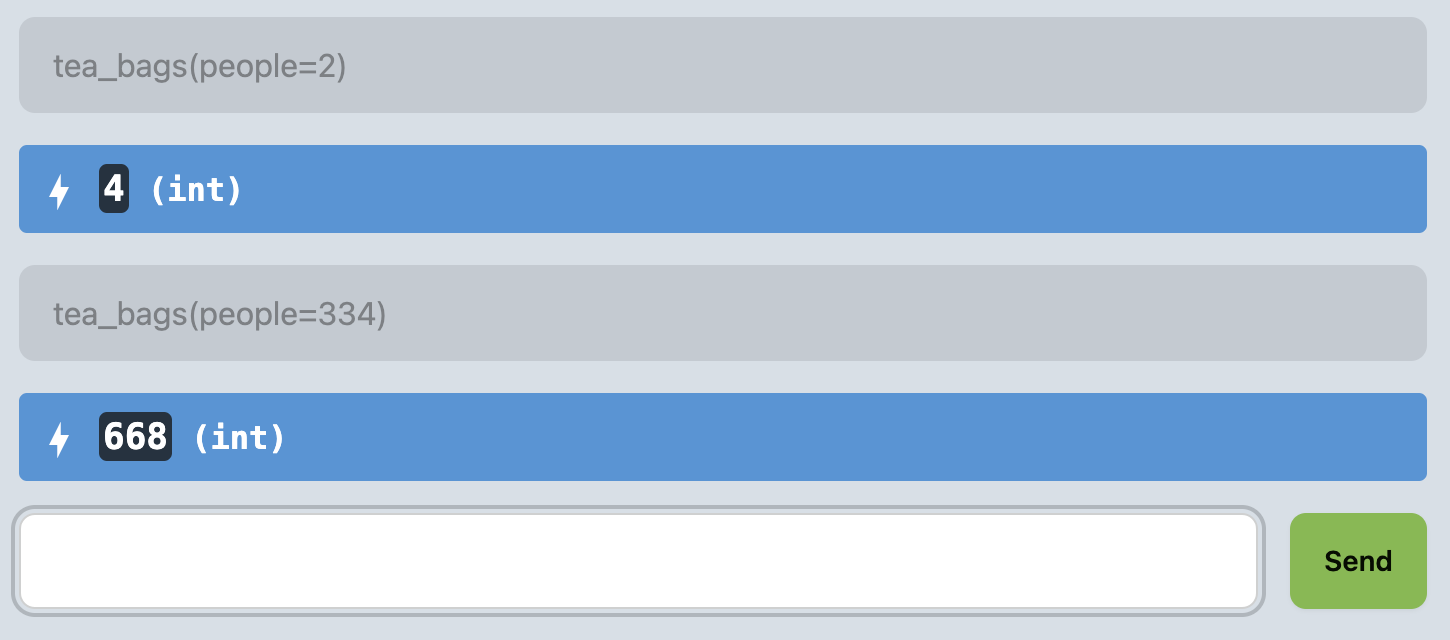
tea_bags REPL ExamplesTry a few additional function calls to be sure your function is working as you expect!
2. Defining the treats Function
Now let’s implement a function to compute the number of treats needed based on the number of teas guests are expecting to drink. Add a couple blank lines following your tea_bags function and then define a function with the following expectations:
- Name:
treats - Parameters:
peopleparameter of type:int- the number of guests attending the tea party
- Return Type:
int - Add a Docstring describing the purpose of the function
The treats function will assume for each tea a guest drinks, they will, on average, want 1.5 treats to accompany it.
Notice that this function is given people as a parameter, not the number of teas. In the return statement of your treats function, you must make a call to your tea_bags function in order to compute the number of teas. Then, you can use that value to compute the number of treats. This function call to tea_bags must use keyword argument for full credit. The autograder will grade based on these expectations!
You want to be careful of the data type returned by your treats function. You will need to convert the result of your computation to an int before returning it.
Once you have implemented your function definition, save your file, and test it out in the Trailhead Interact REPL. You should expect to be able to make calls and see their return values like below:
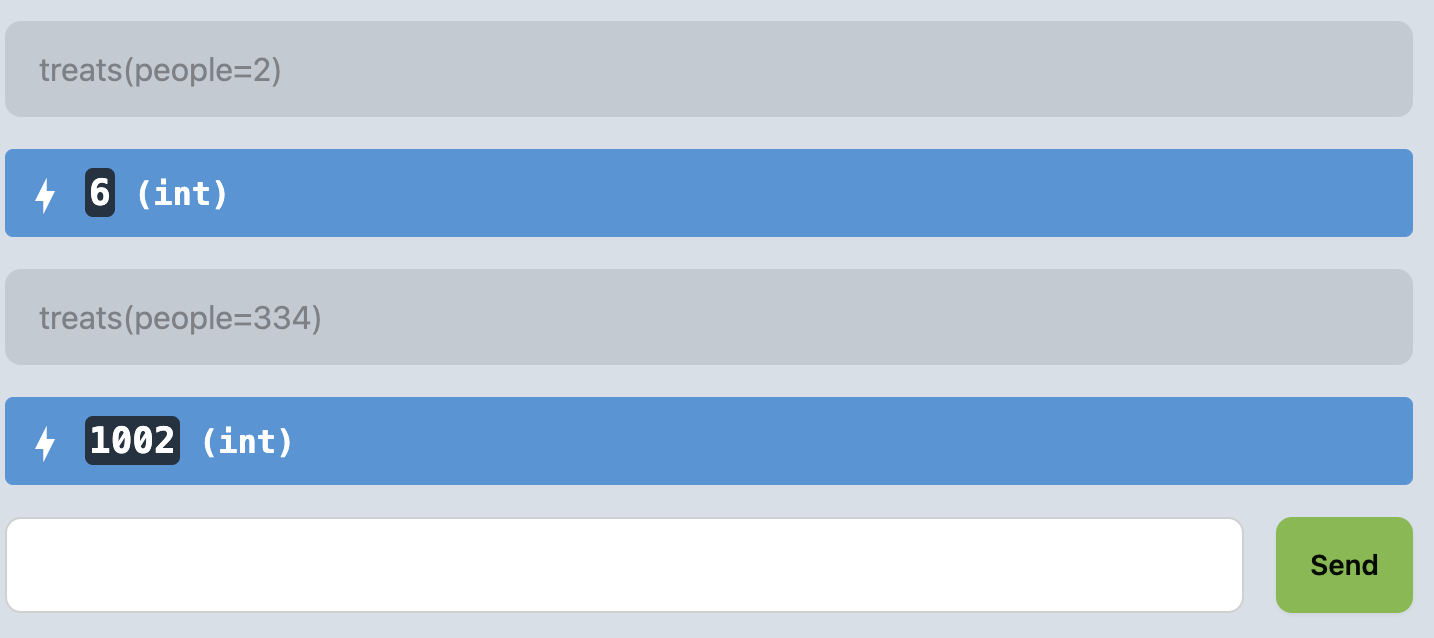
treats REPL ExamplesTry a few additional function calls to be sure your function is working as you expect!

3. Defining the cost Function
Now let’s implement a function to compute the cost of the tea bags and the treats combined. Add a couple blank lines following your treats function and then define a function with the following expectations:
- Name:
cost - Parameters:
tea_countparameter of type:int- the number of tea bags neededtreat_countparameter of type:int- the number of treats needed
- Return Type:
float - Add a Docstring describing the purpose of the function
The cost function will assume each tea bag costs $0.50 and each treat costs $0.75. The function should return the total cost of the tea bags and treats combined.
Once you have implemented your function definition, save your file, and test it out in the Trailhead Interact REPL. You should expect to be able to make calls and see their return values like below:
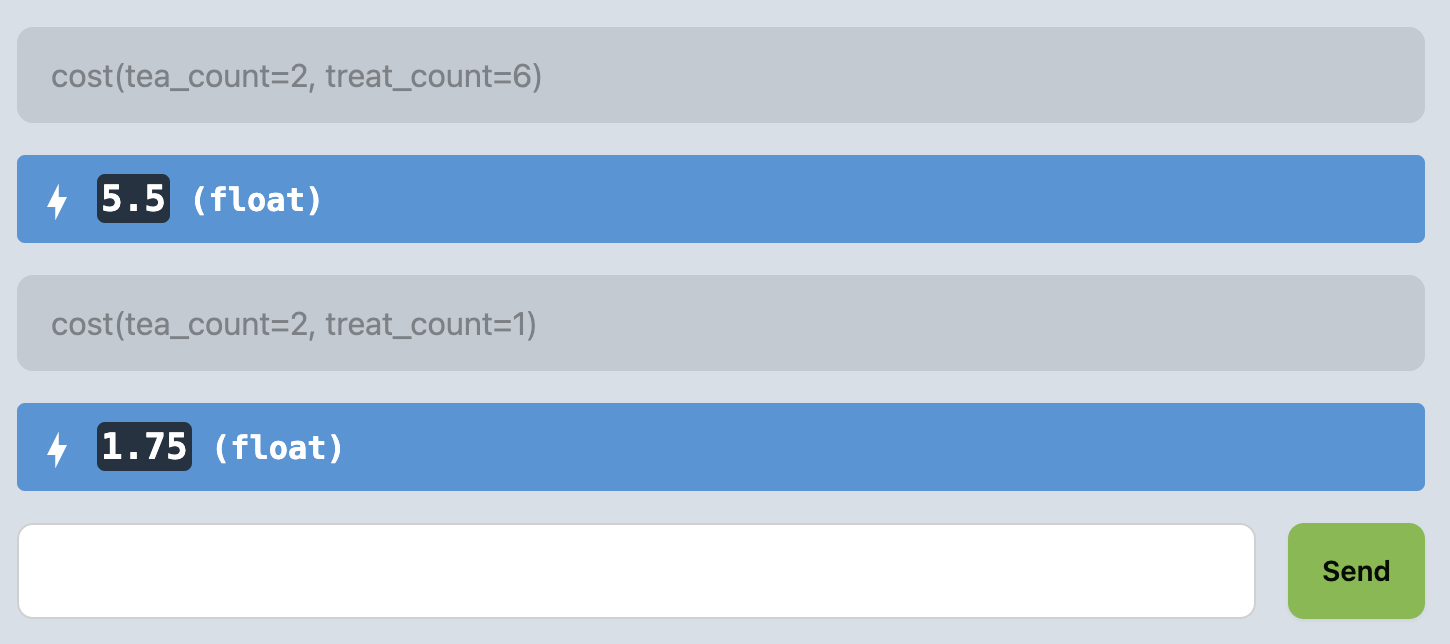
cost REPL Examples4. Defining the main_planner Function
Now let’s implement a function to bring all of these functions together in a “main planner” function that calls each and produces printed output.
It is conventional to write “main” functions as the first function definition in a program. Rather than adding this function definition after your cost function, try defining this function above your tea_bags function. This is a convention that helps you read your program kind of like a newspaper article: the big picture of the program is at the top and the details follow.
Add a couple extra lines below your __author__ line and then define a function with the following expectations:
- Name:
main_planner - Parameters:
guestsparameter of type:int- the number of guests attending the tea party
- Return Type:
None - Add a Docstring describing the purpose of the function to be the entrypoint of your program
There is something new and different about this function than the others you have written so far: it does not return a value. Instead, it will print output to the screen. This is a common pattern for “main” functions: they orchestrate the execution of a program and produce output, but they do not return a value. Anotha special feature of a function that returns None is that it does not need a return statement. The function will return None by default. However, you are welcome to include a final line of return None in its body.
This function body will have multiple lines following the Docstring. Each line will be a print statement with a string literal concatenated with the results of calling your function definitions. The string literals should be formatted to match the exact output of the uses shown below:
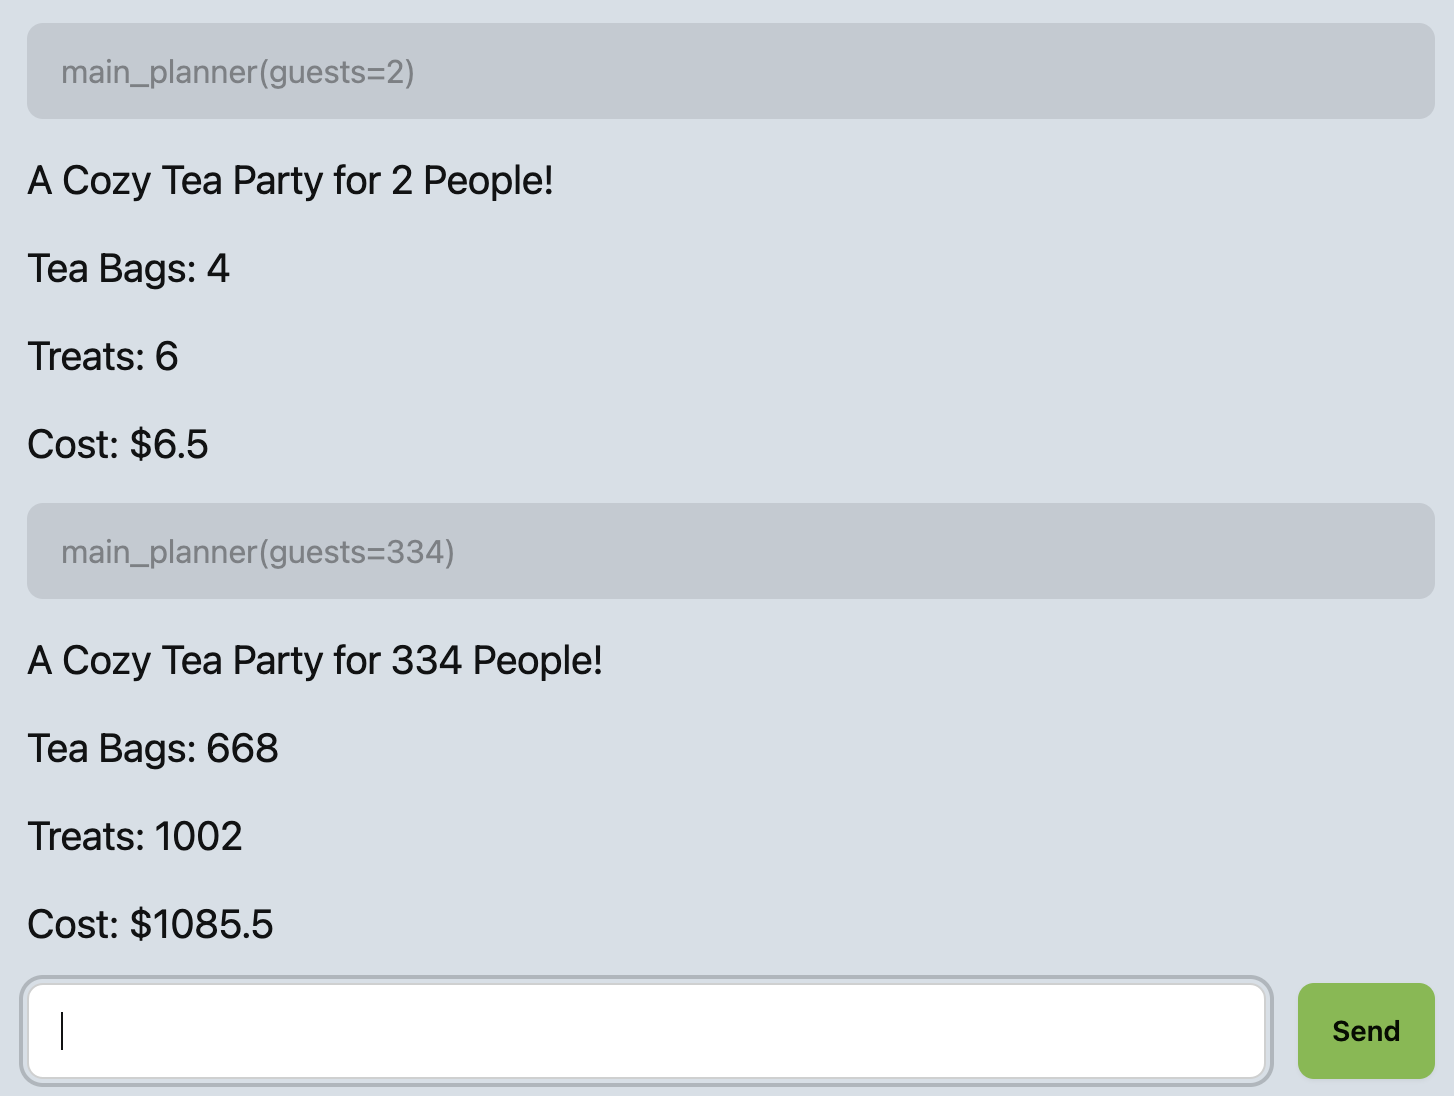
main_planner REPL ExamplesYou should not be performing any arithmetic computations in main_planner, all of the arithmetic is handled in your functions tea_bags, treats, and cost. Your main_planner function must call the other function definitions you have written to perform these calculations.
5. Making the Program Runnable
Now that you have defined all of your functions, you can make your program runnable. Once again, we will use the same idiom from EX00 to make our Python module runnable. These lines need to come a few lines after all function definitions:
if __name__ == "__main__":
    main_planner(guests=int(input("How many guests are attending your tea party? ")))
After adding these lines to the end of your program, you should now be able to go to the “Run” tab of your program, be prompted for a guests count, and see the output of your program.
Congrats! You can now plan a cozy tea party with your woodland CAMP110 friends!

6. Submitting Your Work to Gradescope
Now is a good time to submit your work to the autograder!
In VSCode, open a new integrated Terminal with `Ctrl+Shift+``, or going to the Terminal menu and selecting “New Terminal”. We will learn more about what the terminal is and gain experience with “command line interfaces” later in the course. For now, enter the following command into the terminal and press enter:
python -m tools.submission exercises/ex01_tea_party.pyYou will notice a file appeared in your workspace named 24.01.dd-hh.mm.ss-ex01_tea_party.py.zip. You will see numbers for the current day of the month in place of dd, 24-hour digits in place of hh, minutes in place of mm, and so on. This “zip” file contains your work and is what you will submit to the autograder.
In Gradescope, open assignment “EX01 - Tea Party Planner”. You should see an area to upload a zip file. Click this area and browse to your course’s workspace directory on your computer. You should see the zip file you just created. Select it and upload it to Gradescope. Autograding should complete within about a minute and you should see a score of 100%, or more if you are submitting early. If you see less than 100%, try to understand the feedback and the points that were taken off and resubmit. If you are still having trouble, please come see us in office hours!
7. Make a Backup Checkpoint “Commit”
Now that your first program is complete, let’s practice making a backup. Visual Studio Code has built-in support for git source control management (SCM). SCM tools are made to help create versioned checkpoints of a project’s source code (your program is source code!) amont other uses. The current de facto SCM is called git. As one more piece of terminology, a checkpointed version in git is called a commit. Once your work is in a commit checkpoint, you can always return back to your project at that point in time without the risk of losing work. We encourage committing work to backup at least each time you submit a project for grading or are finishing out a working session for the day. Commits are free to make and can only help you avoid losing work; use them liberally!
- Open the Source Control panel (Command Palette: “Show SCM” or click the icon with three circles and lines on the activity panel).
- Notice the files listed under Changes. These are files you’ve made modifications to since your last backup.
- Move your mouse’s cursor over the word Changes and notice the + symbol that appears. Click that plus symbol to add all changes to the next backup. You will now see the files listed under “Staged Changes”.
- If you do not want to backup all changed files, you can select them individually. For this course you’re encouraged to back everything up.
- In the Message box, give a brief description of what you’ve changed and are backing up. This will help you find a specific backup (called a “commit”) if needed. In this case a message such as, “Finished Exercise 01!” will suffice.
- Press the Commit button to make a Commit (a version) of your work.
- In the Terminal, type the command
git push backup main. If your terminal was closed, go to the Terminal menu and select “New Terminal”. This command “pushed” your changes to your backup repository on GitHub.
To see your commit on Github, in a web browser, navigate to https://github.com/comp110-24s-003/comp110-24s-workspace-USERNAME and substitute USERNAME with your GitHub username. You should see your work in exercises/ex1_tea_party.py backed up to GitHub. Notice above the file’s content’s you’ll see your commit message.
8. Congratulations!
