In this exercise, we will take inspiration from the free, viral word puzzle game Wordle. If you haven’t played it, you should! We now have all the conceptual tools needed to recreate this popular game!
Have you tried solving today’s Wordle? If not, do so first!
In this exercise, you will prompt the user to guess a word that matches the length of a secret word. The secret word for hand-in and testing purposes will be "codes". Your program must work with secret words of any length, though! After submitting to autograding for full credit, you should change your word and let friends and family play your new and improved game.
Follow the implementation steps below, working one function at a time. To get a sense of where you are going, see the demo play through below. After implementing each function, you should test it in the Trailhead REPL.
Permitted Constructs
We expect you to implement this exercise using only the concepts covered in COMP110. If you have no prior programming experience, you can skip this section. If you have prior programming experience, restrict your implementation to only the concepts covered. While there are many ways to implement this program with additional concepts beyond those we have covered, you should not attempt to do so until after submitting this exercise for full credit once the autograder is posted. Gaining additional practice with the fundamentals may feel clunky, but will help ensure you have full command over the concepts we expect you to know. Additionally, it is good practice for working in other programming environments which are more constrained and require creativity to overcome restrictions. For this exercise, you will be penalized for using any kind of loop construct other than a while loop. Additionally, the in operator, the break operator, and string methods (such as .count and .format) are not permitted.
Big Picture
In this program you will implement a main function that contains Wordle’s “game loop”. The game loop is what controls the overall game logic. The main flow of the game works as follows:
- You have up to six turns
- Each turn the player gets to
input_guessof the same length of each word- If the guess is a different length, you get to try making another guess until a guess is the correct length
- The guess is compared with the secret and
emojified/ “codified” boxes are output- ⬜ White boxes for letters that don’t exist in the secret
- 🟩 Green boxes for letters that match the secret at the same position
- 🟨 Yellow boxes for each guessed letter the secret
contains_char, but at a different position
- If the guess was correct, the game is over and the player wins
- If the guess was incorrect, the game loop goes back to step 2 and continues with next turn
Each of the four monospace font-face words above (main, input_guess, emojified, and contains_char) will be implemented as a function definition to logically structure the process of your program into simpler abstractions that can be reused. Expectations for each function are covered below.
You will start by building the smaller, simpler building-block functions first (contains_char which helps you build emojified, then input_guess), before finally bringing together emojified and input_guess for use in main’s game loop. This bottoms-up process helps us break down the problem into more manageable steps.
Part 0. Update Trailhead and Set up the Python Program
In Visual Studio Code, be sure your workspace is open. (Reminder: File > Open Recent > comp110-YYS-workspace is a quick way to reopen it! Where YY is the current year and S is the semeseter: S for Spring, F for Fall.)
Open the Explorer pane (click the icon with two sheets of paper or to to View > Explorer) and expand the Workspace directory.
Right click on the exercises directory and select “New File”. Enter the following filename, being careful to match capitalization and punctuation:
ex03_wordle.py
Before beginning work on the program, you should add a docstring to the top of your Python module just as you have previously. Then, you should add a line with the special variable named __author__ assigned to be a string with your 9-digit student PID.
Part 1. contains_char - 10 points
Declare a function named contains_char. This function is given two strings as arguments, the first of any length, the second a single character. It will return True if the single character of the second string is found at any index of the first string, and return False otherwise. More specifically, declare your contains_char function such that:
- It has two parameters (name them descriptively)
- A string that is being searched through for the second parameter
- A string that is expected to be a single character in length and is the character being searched for
- A boolean return type
- A docstring describing the purpose of the function in your own words
Since the caller of this function can be expected to provide the correct arguments, specifically a second argument whose length is one, we will “assert” this assumption in our code such that an error is raised if it is not found to be true. As the first line of code in your function’s body, add the following assert statement and fill in the blank (_____) with your second parameter’s name:
assert len(____) == 1, f"len('{_____}') is not 1"
To implement this function, iterate over each index of the first parameter string to see if the character at that index is equal to the second parameter of the function. If so, return True. Otherwise, after searching all indices of the first parameter and not finding the character you were looking for, return False.
Once you have your best first attempt to implement this function, you should try testing it out in the Trailhead REPL. Some example tests are below:

Part 2. emojified - 20 points
Declare a function named emojified. Its purpose is given two strings of equal length, the first a guess and the second a secret, it will return a string of emoji whose color codifies the results of a guess using Wordle’s logic. You should use the following named constants for emoji:
WHITE_BOX: str = "\U00002B1C"
GREEN_BOX: str = "\U0001F7E9"
YELLOW_BOX: str = "\U0001F7E8"
As a reminder, the resulting string will have a white box for any letter of the secret not in the guess. It will be green for a letter in the guess and secret that are matching at the correct position. It will be yellow for a letter in the guess that is in the secret but not at the correct position.
The body of this function must make use of your contains_char function definition by calling it to test for yellow or white box codification. Using this description, write your function header and docstring.
Since you can reasonably expect anyone using this function to provide strings of equal length, you can add the following assertion as the first line of your function implementation following your docstring, replacing the capitalized words with your function’s parameter’s names:
assert len(REPLACE_THIS_WITH_YOUR_GUESS_PARAMETERS_NAME) == len(REPLACE_THIS_WITH_YOUR_SECRET_PARAMETERS_NAME), "Guess must be same length as secret"
Once you have implemented this function, test it out in the Trailhead REPL.
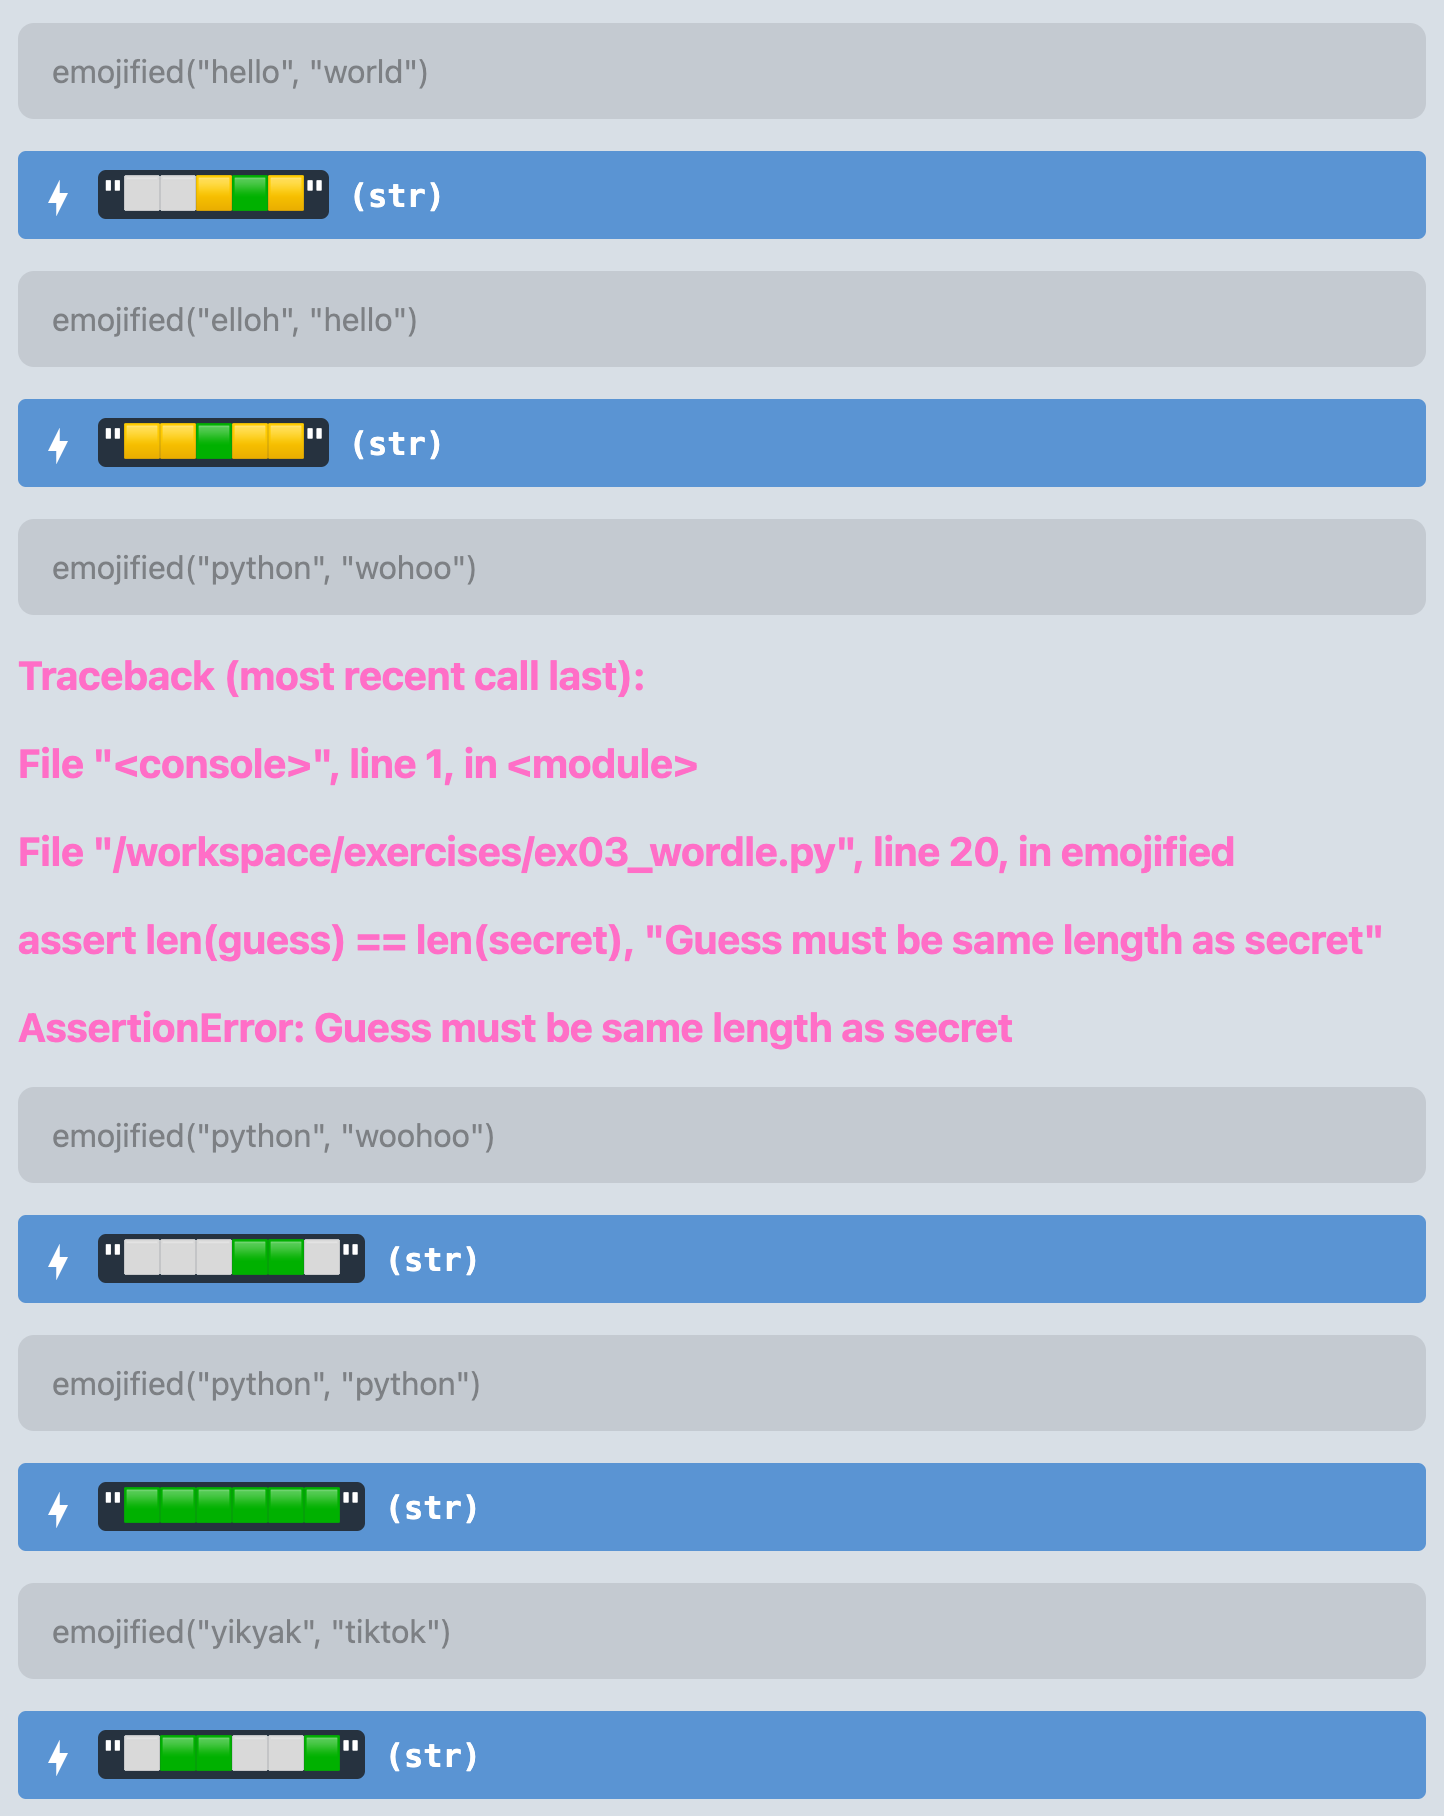
Now you have a function that, given a guess and a secret of the same length, will Wordle emojify the results of the guess! Notice how your emojified function makes use of the simpler contains_char function to build up more complex behavior. Once your emojified function is working correctly, as shown above, continue on.
Part 3. input_guess – 10 Points
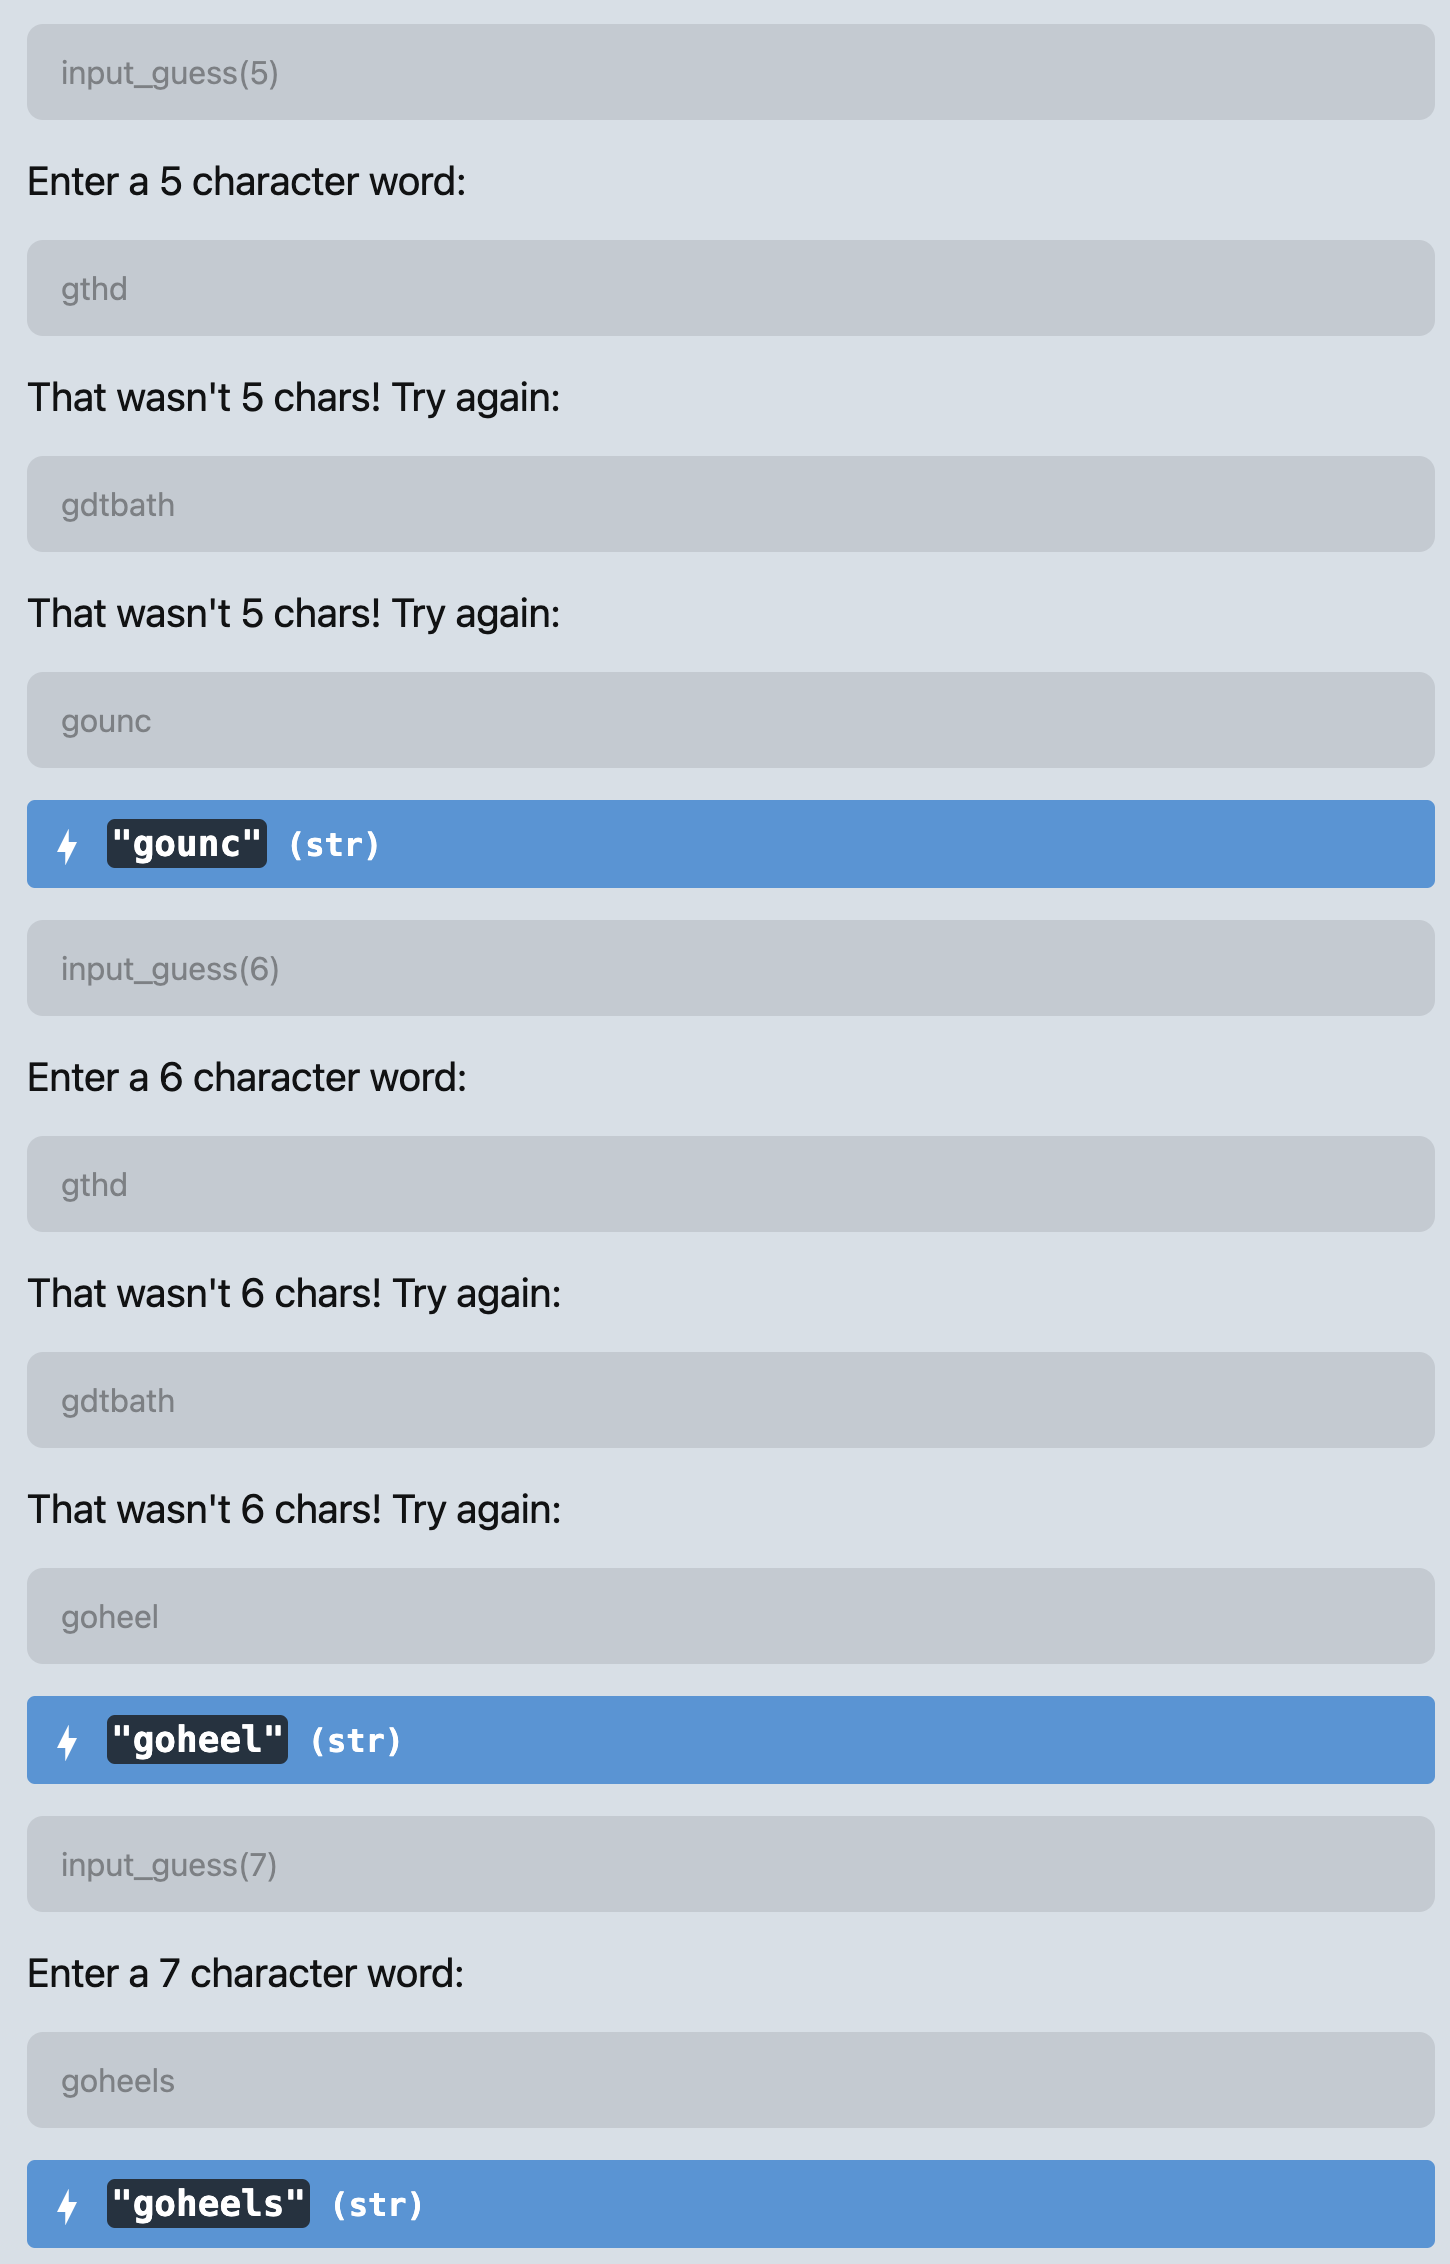
Declare a function named input_guess. Its purpose is given an integer “expected length” of a guess as a parameter, it will prompt the user for a guess and continue prompting them until they provide a guess of the expected length. The initial prompt should have the following format: Enter a N character word:, where N is the desired length. Then, use the following format to continue prompting the user: That wasn't N chars! Try again:. This function must then return the user’s guess string of the correct length to the caller of input_guess.
Once you have implemented this function, try using it in the Trailhead REPL.
Part 4. main – 30 Points
Now it’s time to pull together your functions, which are building blocks, into a main function that implements the high-level logic of the Wordle game loop. The purpose of the main function is to establish what the secret word is as a parameter to main, keep track of how many turns the user has spent, whether the user has won the game, and control the flow of the game.
The declaration of your main function is unlike the functions above because it will return None. You can decare your main function as follows:
def main(secret: str) -> None:
"""The entrypoint of the program and main game loop."""
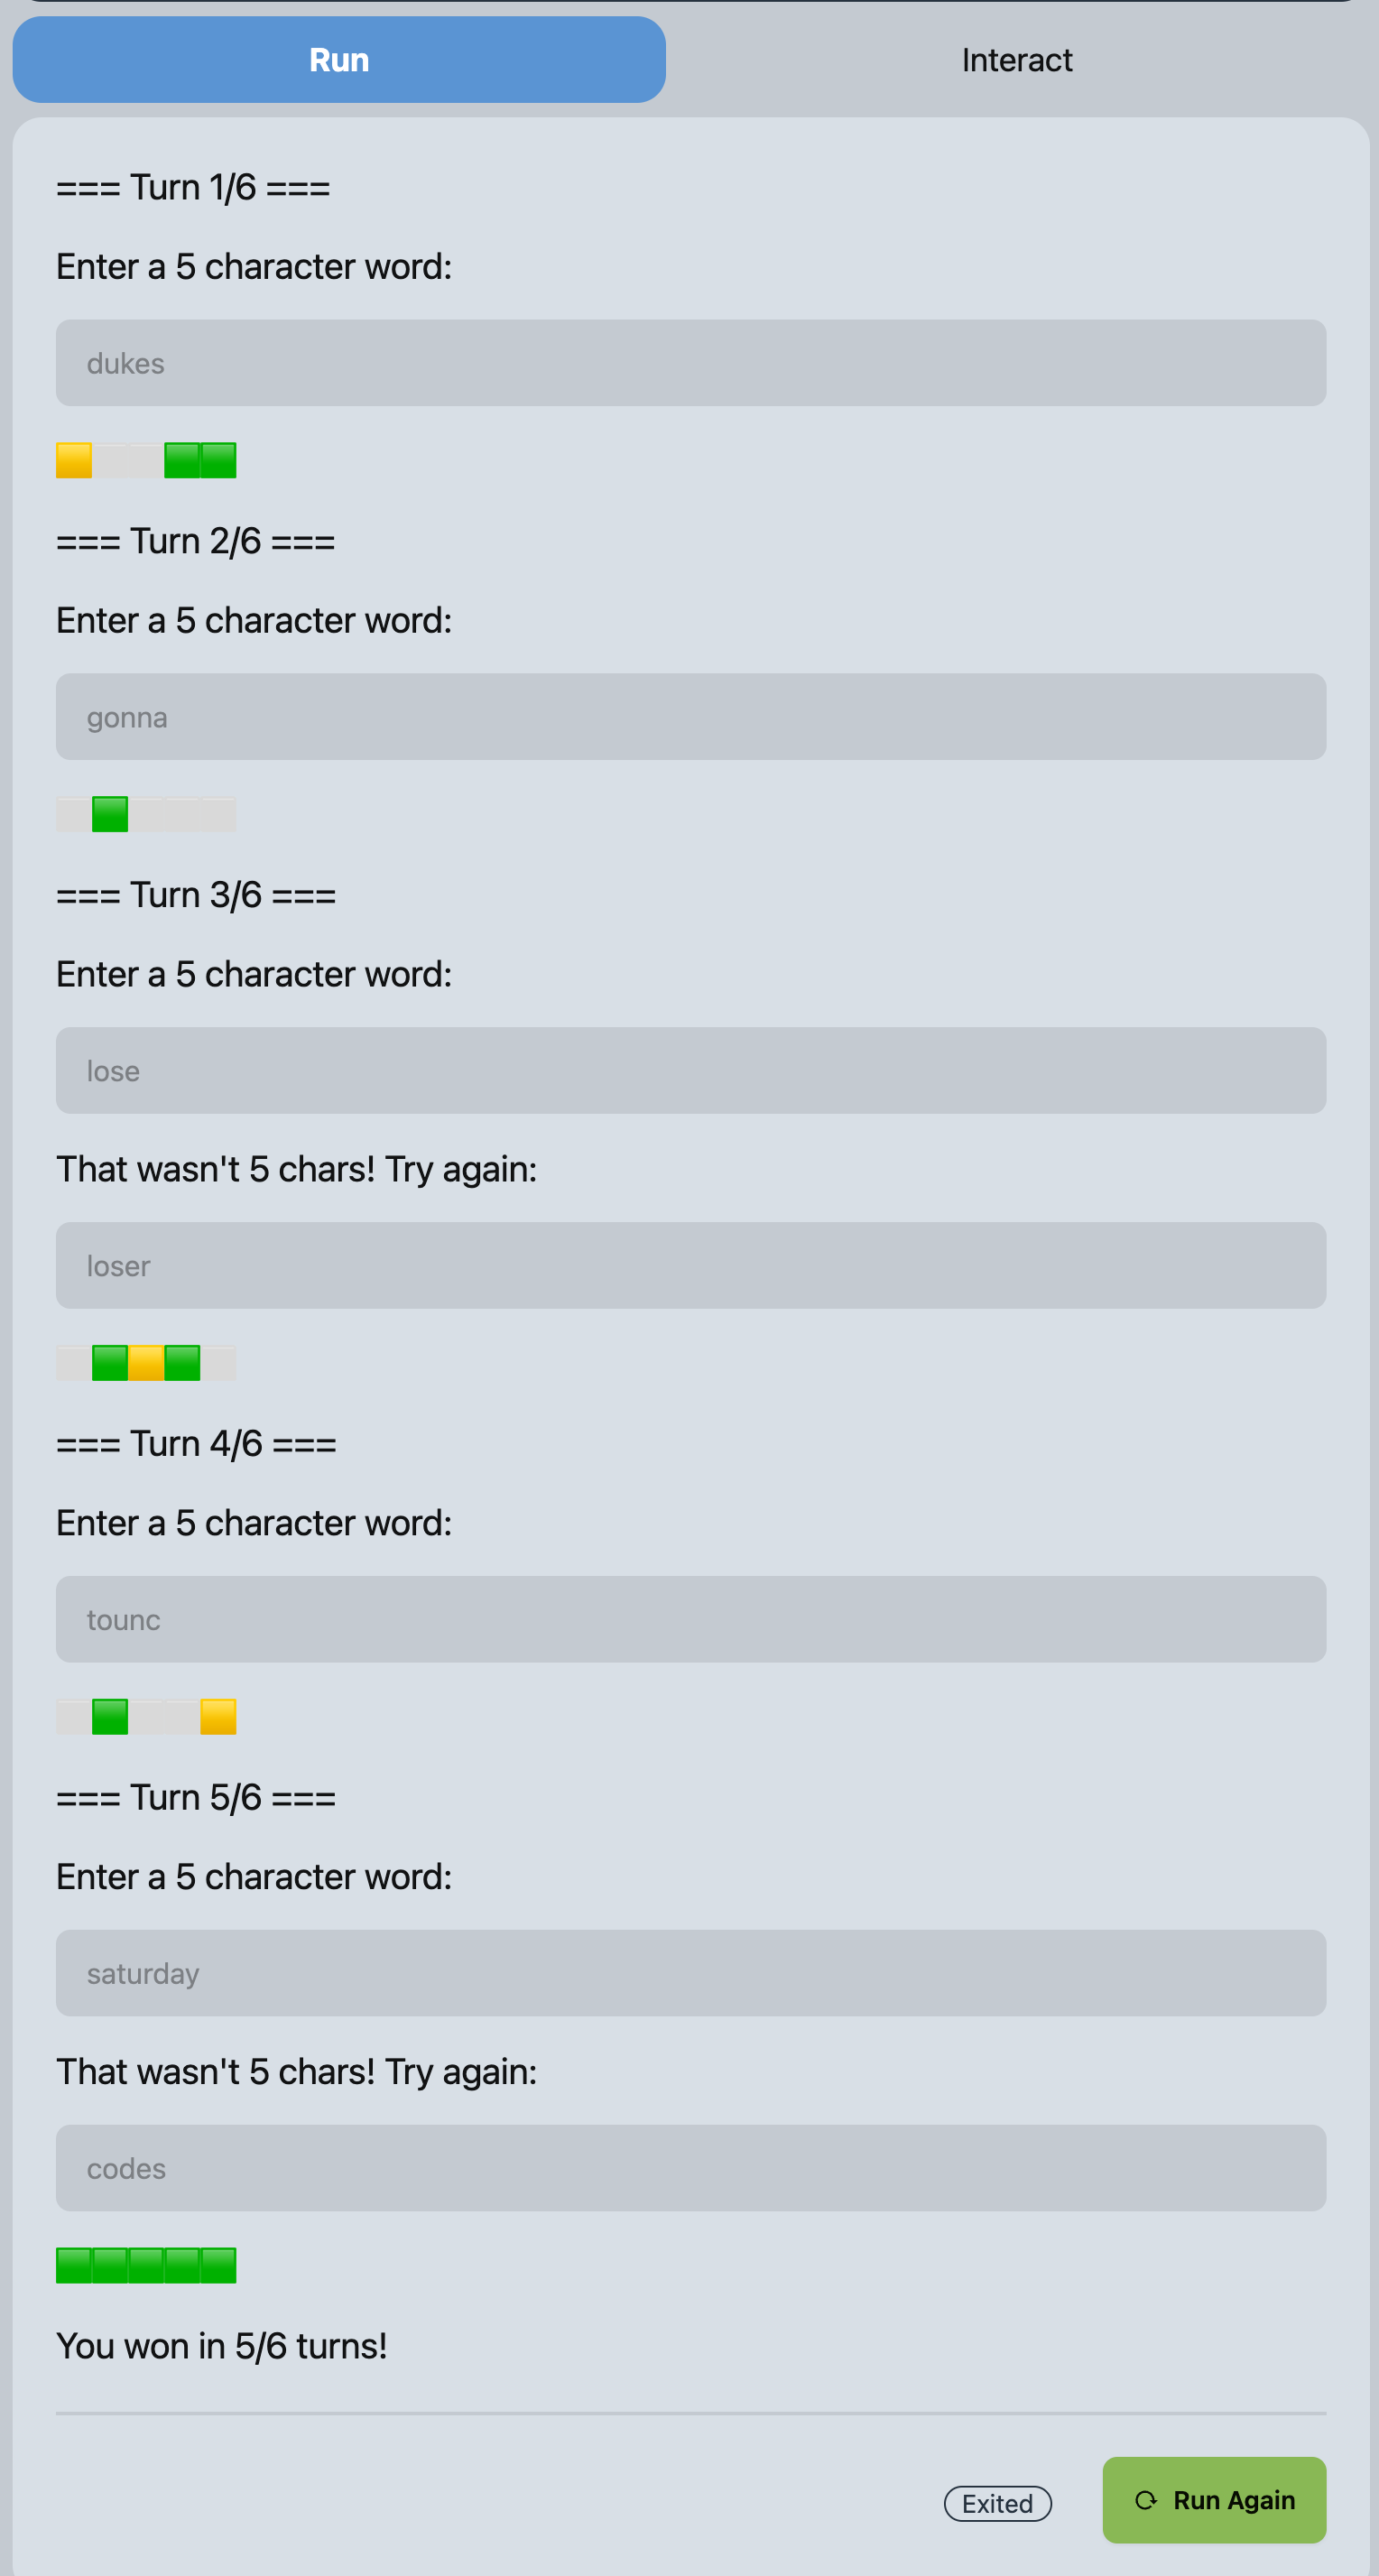
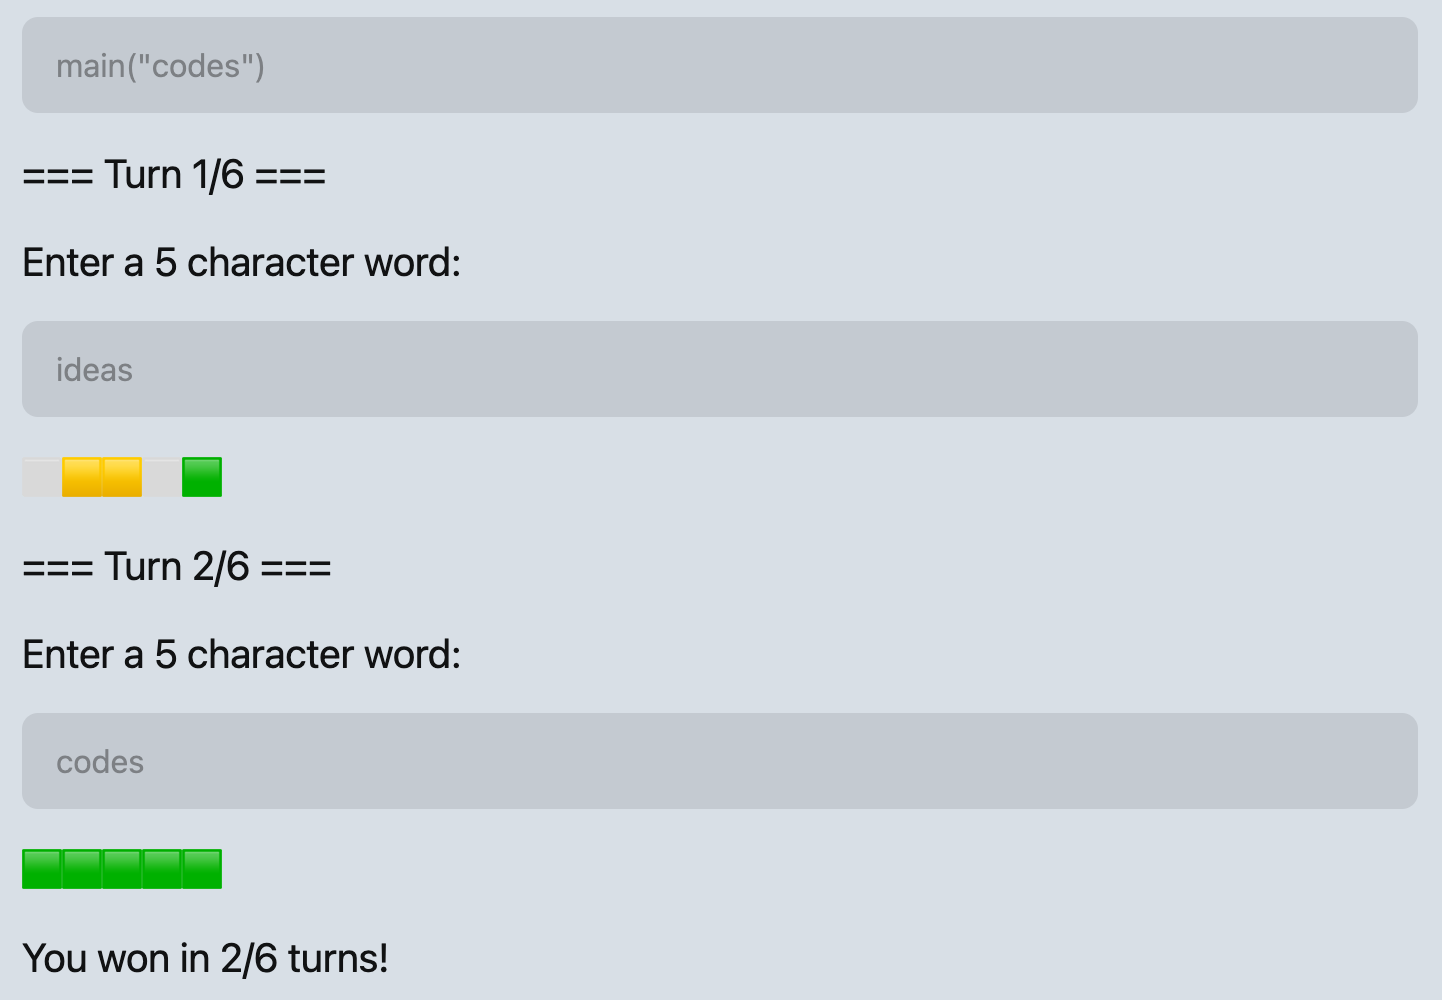
# Your code will go hereCalling your main function with a secret will start the game with a given secret. For example main("codes") can be used for testing purposes in the Trailhead REPL. Here is a successful run:
The “state” of a game refers to the variables you need to keep track of in memory in order to run the game. What variables do you need to keep track of? Define those inside of main’s body first.
Then, begin the game loop while the user still has turns left to play and has not yet won, you will want to do the following:
- Print the current turn number in a format such as
=== Turn 1/6 === - Prompt the user for a guess, relying on your function
input_guessto obtain a guess of the correct length. - Codify the emoji results of the user’s guess versus the secret by making use of your
emojifiedfunction. Print the resulting codified string. - If the user’s guess is the secret, the user has won!
- Otherwise, move on to the next turn.
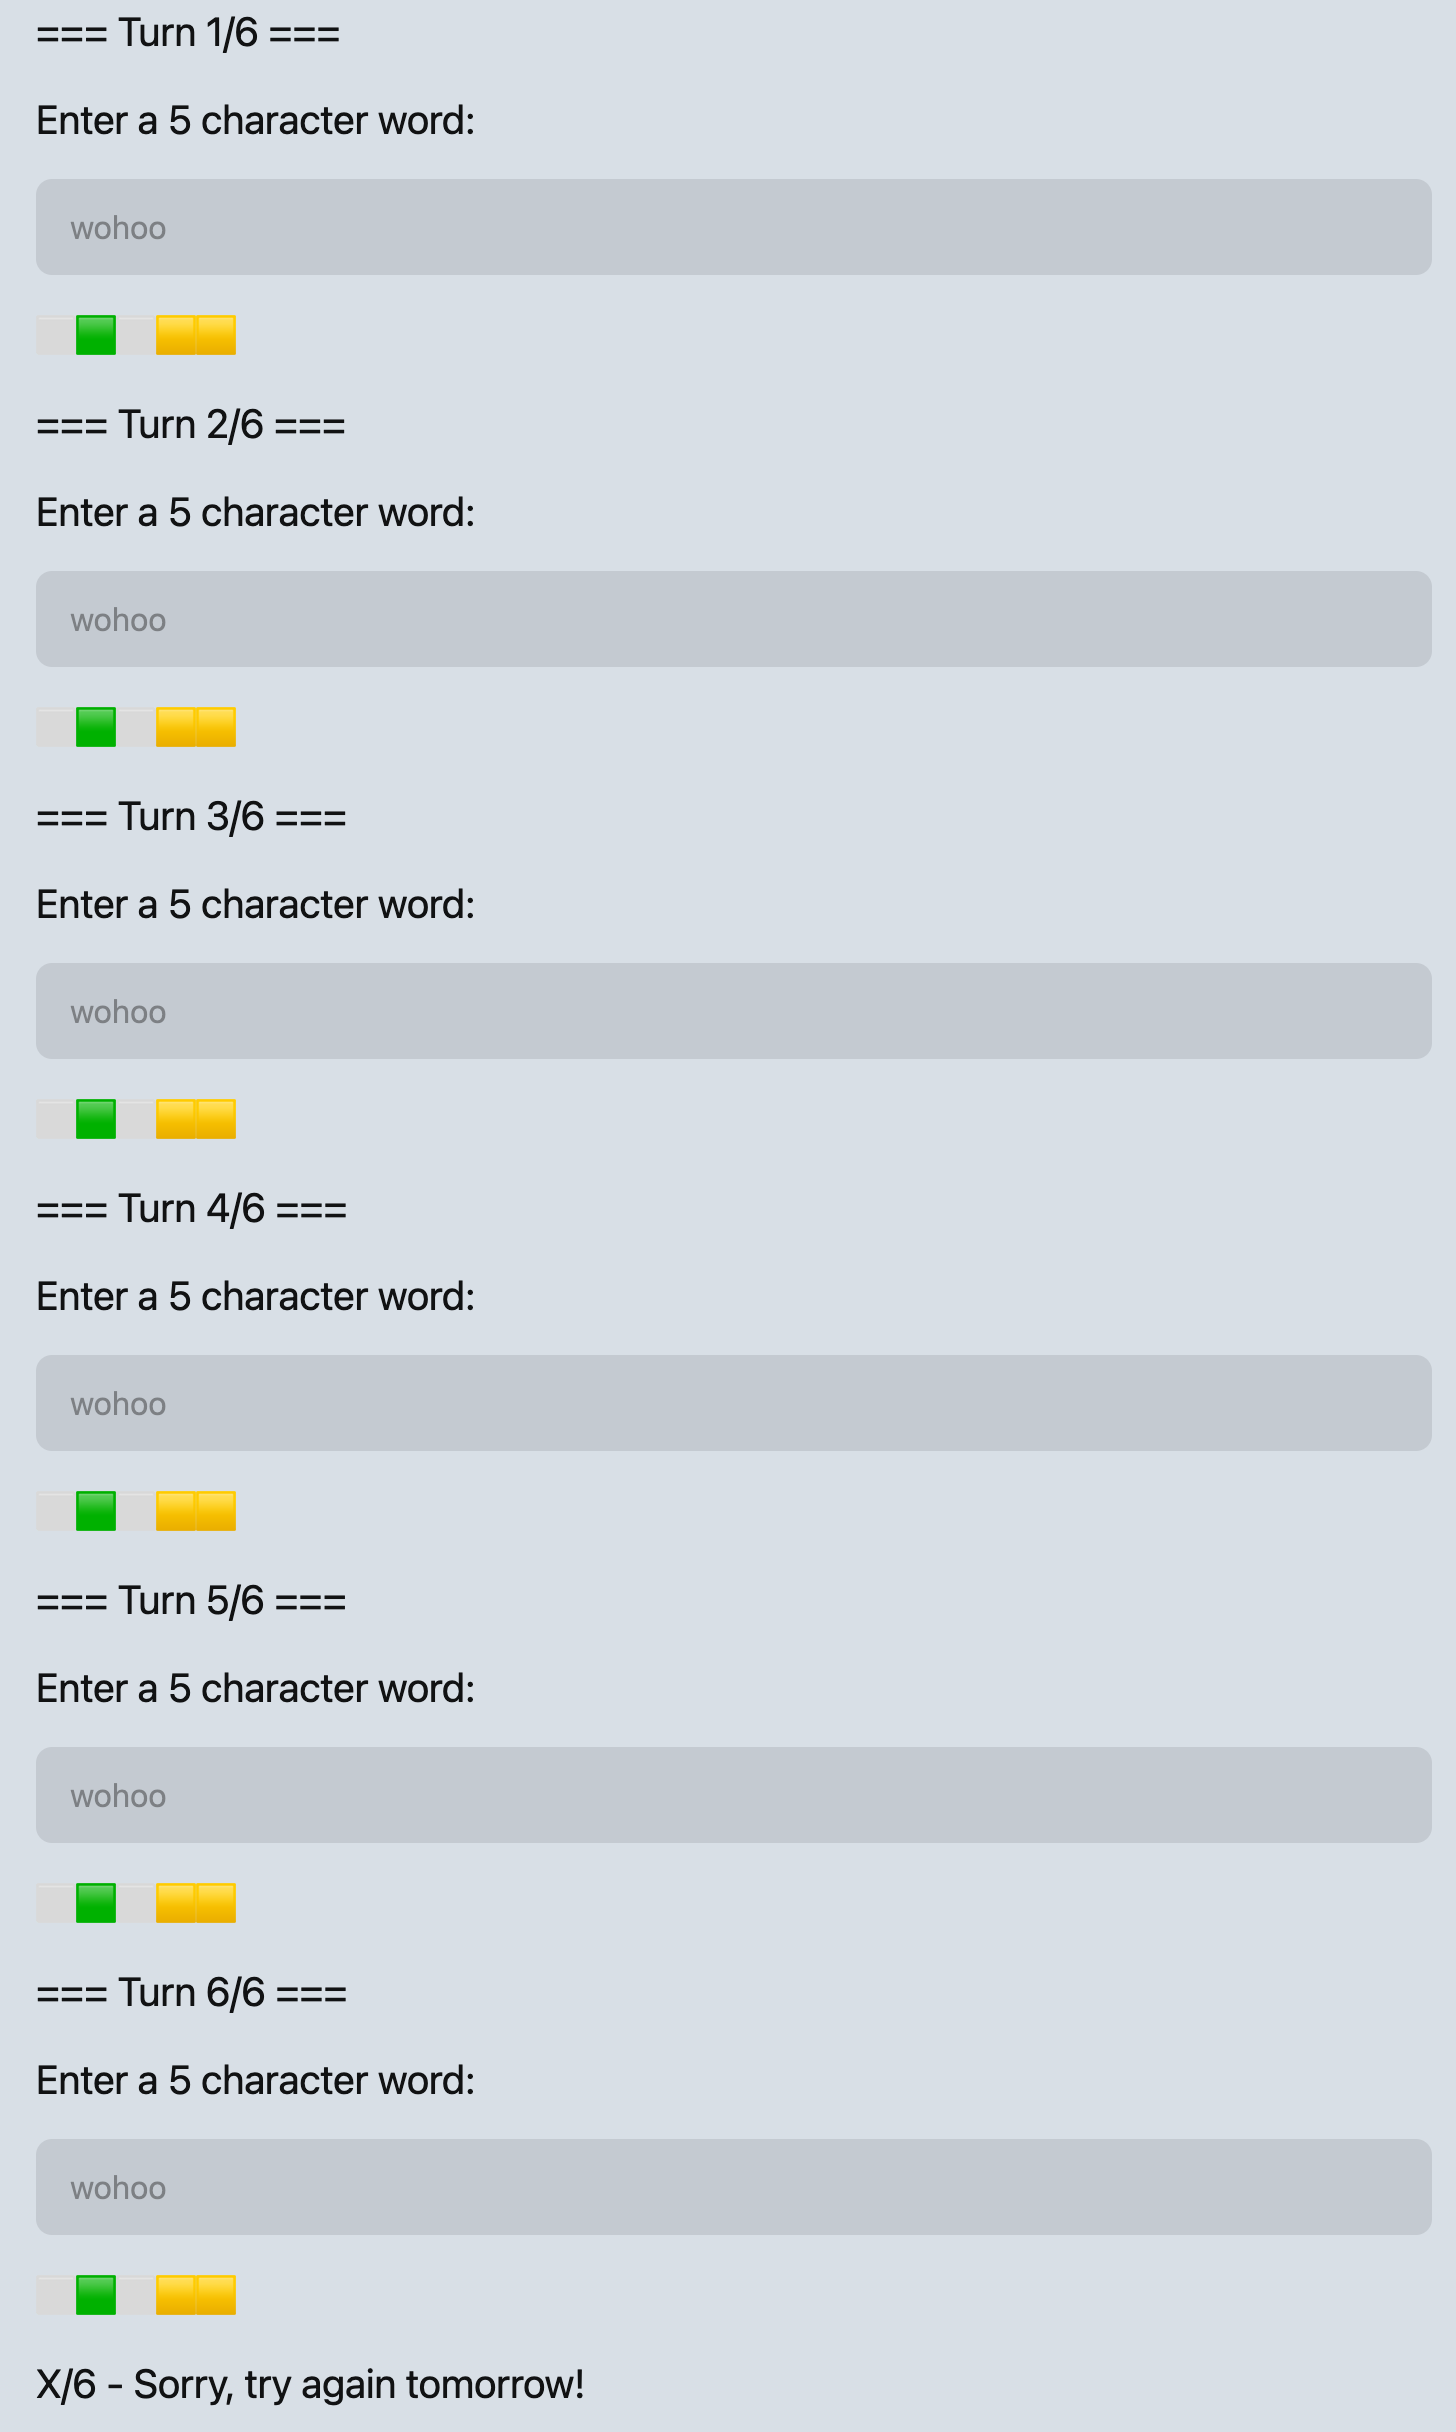
After the game loop, if the user won, print You won in N/6 turns! where N is replaced with the number of guesses it took to get the word. Otherwise, when the user does not guess the word in 6 or fewer guesses, print the following message: X/6 - Sorry, try again tomorrow! where X is literally the character X.
Here is an example of a failed run of guesses:
Once you have your main function and game loop working, there’s only one bit of icing left to add to your delicious code cake. We will fully explain what is going on in the following code snippet soon, but for now note that this is an idiom common to Python programs like the one you have written. We will learn it does two things: 1. it makes it possible to run your Python program as a module (if you tried python -m exercises.ex03_wordle right now you would see nothing happens), and 2. it makes it possible for other modules to import your functions and reuse them. Add the following snippet of code as the last 2 lines of your program (notice, there are two underscores on both sides of the words name and main):
if __name__ == "__main__":
    main(secret="codes")
Now you can try running your game in the “Run” tab of Trailhead. You can also try playing your game as a module in the terminal of VSCode: python -m exercises.ex03_wordle
Part 5. Style and Documentation Requirements – 20 Points (Manually Graded)
We will manually grade your code and are looking for good choices of meaningful variable names. Your variable names should be descriptive of their purposes. (Loop indexing variables can be short, such as i, or idx.) You should also use the Python snake_case convention where variable names are all lowercase and new words are separated by underscores.
You should add code comments in your own English words to describe what is happening at important stages of your program.
Your program should work regardless of the secret’s length. Thus, you should not have any hard-coded numbers (such as 6 for "python"). All numbers that appear in output and the boundaries of loops should be based on the len-gth of your secret word.
Part 6. Type Safety - 9 Points
The autograder uses industry standard tools for checking the type safety of your programs (e.g. being sure you’re using variables of the correct data types in valid ways). If you have point deductions on Type Safety, read through the feedback the autograder gives and it should direct you to the line number in your program with the issue.
Submitting Your Work to Gradescope
Now is a good time to submit your work to the autograder!
In VSCode, open a new integrated Terminal with `Ctrl+Shift+``, or going to the Terminal menu and selecting “New Terminal.” We will learn more about what the terminal is and gain experience with “command line interfaces” later in the course. For now, enter the following command into the terminal and press enter:
python -m tools.submission exercises/ex03_wordle.pyYou will notice a file appeared in your workspace named 24.02.dd-hh.mm.ss-ex03_wordle.py.zip. You will see numbers for the current day of the month in place of dd, 24-hour digits in place of hh, minutes in place of mm, and so on. This “zip” file contains your work and is what you will submit to the autograder.
In Gradescope, open assignment “EX03 - Wordle”. You should see an area to upload a zip file. Click this area and browse to your course’s workspace directory on your computer. You should see the zip file you just created. Select it and upload it to Gradescope. Autograding should complete within about a minute and you should see a score of 100%, or more if you are submitting early. If you see less than 100%, try to understand the feedback and the points that were taken off and resubmit. If you are still having trouble, please come see us in office hours!
Make a Backup Checkpoint “Commit”
Now that your Wordle program is complete, make a backup by making a git commit. You should now have experience with this process and can hopefully do this without instructions, but if not you can follow these steps as a refresher:
- Open the Source Control panel (Command Palette: “Show SCM” or click the icon with three circles and lines on the activity panel).
- Notice the files listed under Changes. These are files you’ve made modifications to since your last backup.
- Move your mouse’s cursor over the word Changes and notice the + symbol that appears. Click that plus symbol to add all changes to the next backup. You will now see the files listed under “Staged Changes”.
- If you do not want to backup all changed files, you can select them individually. For this course you’re encouraged to back everything up.
- In the Message box, give a brief description of what you’ve changed and are backing up. This will help you find a specific backup (called a “commit”) if needed. In this case a message such as, “Finished Exercise 03!” will suffice.
- Press the Commit button to make a Commit (a version) of your work.
- In the Terminal, type the command
git push backup main. If your terminal was closed, go to the Terminal menu and select “New Terminal”. This command “pushed” your changes to your backup repository on GitHub.
To see your commit on Github, in a web browser, navigate to https://github.com/comp110-24s-003/comp110-24s-workspace-USERNAME and substitute USERNAME with your GitHub username. You should see your work in the exercises directory backed up to GitHub. Notice above the file’s contents you’ll see your commit message.